
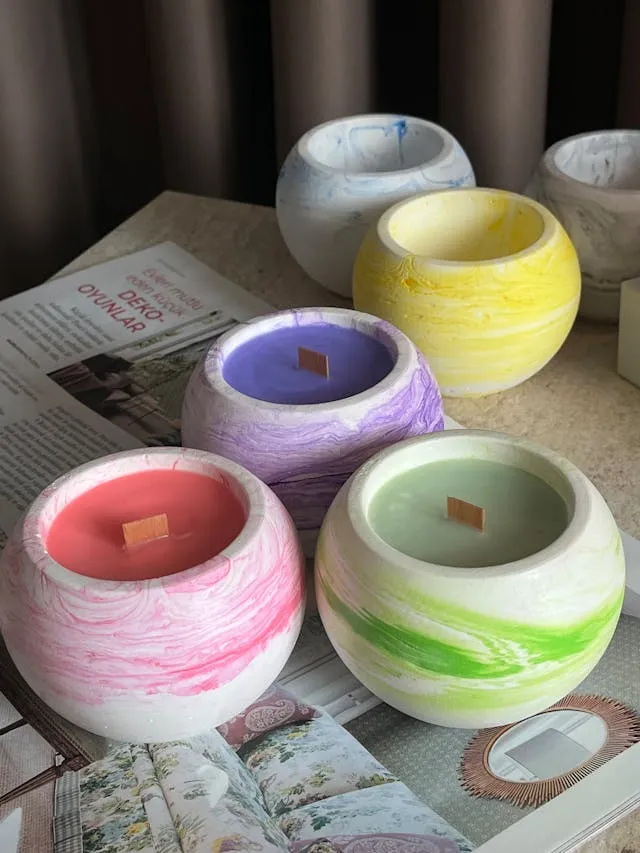
Making candles from crayons is one of those projects that sounds too simple to produce anything worth burning—and then you melt your first batch and realize the colors are absolutely stunning. Crayon wax takes pigment beautifully, produces rich, saturated hues that most commercial candle dyes can’t match, and costs almost nothing when you’re working with a box of old crayons that would otherwise get thrown out.
The catch—and there is one—is that crayons aren’t designed to burn. The pigment in crayons can clog a wick, causing tunneling, poor scent throw, and a flame that sputters or goes out. The solution isn’t to avoid crayons—it’s to use them correctly, which means blending them with the right wax at the right ratio and choosing the right wick for a pigment-heavy candle.
This guide covers six different crayon candle methods—from the simplest single-color container candle to layered, marbled, and shaped variations—with the specific techniques that make each one actually burn properly.
What You Need to Know Before You Start
Crayons as Colorant, Not as the Sole Wax
The most important principle in crayon candle making: crayons are a colorant, not a replacement for candle wax. Using crayons as the only material produces a candle that burns poorly, tunnels badly, and may not stay lit.
The correct approach is to use crayons at 5–10% of the total wax weight as a colorant additive. At this ratio, the crayon pigment colors the candle beautifully without overwhelming the wick or significantly affecting burn performance.
Wax Choice Matters
Different waxes produce different results with crayon pigment:
- Paraffin wax: The best base for crayon candles. It accepts crayon pigment readily, produces vivid color, and has a good burn performance. Container-grade paraffin (lower melt point) works for jar candles; pillar-grade paraffin (higher melt point) works for freestanding candles.
- Soy wax: Works but produces softer, more pastel colors—crayon pigment doesn’t bind as vibrantly in soy. Better for a subtle, muted palette. Soy also has a lower crayon tolerance before burn performance suffers.
- Beeswax: Works well with crayon color and produces a naturally warm tone. The honey-colored base shifts the final color slightly warmer than paraffin.
- Coconut wax: Similar to soy—softer colors, works but not ideal for vivid crayon hues.
For the most vibrant colors and best burn performance, paraffin is the recommended base for crayon candles.
Wick Sizing
Crayon pigment adds solid particles to the wax that the wick must process during burning. Always size up by one wick size from what you’d normally use for the container diameter. A wick that’s slightly too large for plain wax is usually the right size for a crayon-colored candle.
Scent in Crayon Candles
Crayons have a distinctive waxy, slightly paraffin smell. It’s not unpleasant but it’s not subtle either. If you want scented candles, add fragrance oil at the standard rate (6–10% of wax weight) and be aware that the crayon scent will blend with rather than disappear under the fragrance oil. Strong fragrance oils like vanilla, cinnamon, or citrus work best at masking the underlying crayon smell.
What You’ll Need (General Supplies)
- Crayons (any brand—old or broken ones are perfect)
- Candle wax (paraffin, soy, or beeswax)
- Pre-waxed candle wicks with tabs (sized up from standard)
- A double boiler or two saucepans
- A digital kitchen thermometer
- Heatproof pouring pitchers (one per color)
- Candle containers (glass jars, tin cans) or molds
- Wick centering tools or pencils to hold wicks in place
- Fragrance oil (optional)
- A digital kitchen scale
- Silicone spatulas
- Newspaper or a silicone mat to protect your work surface
Method 1: Single-Color Crayon Container Candle (Best Starting Point)
This is the foundation recipe—get this right and every other method on this list follows naturally. A single-color container candle is the best way to learn how crayon pigment behaves in wax before attempting more complex multi-color or layered techniques.
What you’ll need:
- 200g paraffin container wax
- 2–3 crayons in your chosen color (roughly 10–15g, or about 5–7% of wax weight)
- 1 pre-waxed wick with tab, sized up one size from standard
- 1 glass jar or tin can (8 oz capacity)
- Fragrance oil (optional—up to 10% of wax weight, so up to 20g for this batch)
Instructions:
- Prepare your container first. Place the wick tab in the center of the jar bottom, pressing it firmly down. The tab should adhere to the dry glass—if it won’t stick, add a small drop of hot glue. Thread the wick through a pencil or wick centering tool laid across the top of the jar so it stays centered during pouring.
- Set up your double boiler. Fill the bottom pot with a few inches of water and bring to a simmer. Place the pouring pitcher in the water—never melt wax directly on a burner, as wax is flammable and burns at its flash point.
- Weigh the paraffin wax on your kitchen scale and add to the pouring pitcher. Melt slowly over the simmering water, stirring occasionally, until fully liquid.
- Monitor the temperature. Most container paraffin waxes should be kept between 160–180°F during melting. Don’t exceed 200°F—above this temperature, wax can discolor and some fragrance compounds begin to break down.
- Peel and break the crayons into small pieces while the wax melts. Smaller pieces melt faster and more evenly.
- Add the crayon pieces to the melted wax once it’s fully liquid and stir continuously until completely dissolved. Some colors take longer to dissolve than others—dark colors (black, brown, dark red) take longer than light colors. Keep stirring until no crayon streaks remain.
- Add fragrance oil if using, once the crayon is fully dissolved, and stir for one to two minutes to incorporate.
- Allow the wax to cool to 130–140°F before pouring. Pouring too hot causes sinkholes and uneven surfaces; pouring at the right temperature gives a smoother finish.
- Pour the wax into your prepared jar, leaving about half an inch of space at the top. Pour slowly and steadily to avoid creating bubbles.
- Allow to cool at room temperature for at least four hours—don’t move the candle or place in the refrigerator. Moving a cooling candle can cause cracks and uneven surfaces.
- Expect a sinkhole around the wick as the wax cools and contracts—this is normal with paraffin. Once the first pour is fully set (usually three to four hours), reheat the remaining wax and do a small top-up pour to fill the sinkhole.
- Trim the wick to ¼ inch before the first burn and allow the candle to cure for 24–48 hours before using.
Method 2: Layered Crayon Candle (Best Visual Effect)
Layered candles are where crayon’s color vibrancy really shines. By pouring multiple colors in sequence and allowing each to partially set before adding the next, you create a candle with distinct horizontal color bands that look incredible on a shelf and burn through the colors slowly as the candle burns down.
What you’ll need:
- 400g paraffin container wax (divided across layers)
- 3–4 different crayon colors (2–3 crayons per color)
- 3–4 separate pouring pitchers (one per color)
- 1 tall glass jar (12 oz or larger—height matters for layers to show)
- 1 wick with tab, sized up
Instructions:
- Prepare the jar and wick as in Method 1—tab secured at the bottom, wick centered with a pencil across the top.
- Plan your layers. Decide on the order of colors and how thick you want each layer. Equal layers are the simplest—divide the total wax weight by the number of colors. For a 400g batch with four colors, each layer uses approximately 100g of wax.
- Melt and color the first batch of wax following Method 1. Use the lightest or coolest color first if you want a gradient effect (light at bottom to dark at top), or any order you prefer visually.
- Pour the first layer and allow it to cool until it has a matte, completely set surface with no liquid center—usually 45 minutes to one hour at room temperature. The surface should be firm enough to hold the weight of the next pour without breaking through. This timing is critical—pouring the next layer too soon causes the colors to bleed into each other; waiting too long causes the layers to separate and crack when the candle burns.
- While the first layer sets, melt and color the second batch in a separate pitcher so it’s ready to pour when the first layer reaches the right stage.
- Pour the second layer carefully over the set first layer. Pour slowly and aim for the center of the jar rather than the sides—this minimizes disturbance to the set layer below and keeps the layer line clean and defined.
- Repeat for each subsequent layer, always ensuring the previous layer is fully set but not ice-cold before pouring the next.
- Allow the final layer to fully set before doing any top-up pours to fill sinkholes. Top up with the same color as the final layer.
- Trim the wick to ¼ inch and cure for 48 hours before burning.
Tip for cleaner layer lines: Angle the jar slightly when pouring each new layer by propping one side on a folded cloth. This creates a diagonal layer line rather than a perfectly horizontal one—more visually interesting and slightly more forgiving of timing imprecision.
Method 3: Marbled Crayon Candle (Best for a Swirled Effect)
Marbling produces a candle that looks almost too beautiful to burn—swirled colors that create a different pattern every time. The technique is simpler than it looks and works best in wide, shallow jars where the swirl pattern is visible through the glass.
What you’ll need:
- 300g paraffin container wax
- 3–4 crayon colors (2 crayons each)
- 3–4 pouring pitchers
- 1 wide-mouth jar (8–12 oz)
- 1 wick with tab, sized up
- A skewer or chopstick for swirling
Instructions:
- Prepare the jar and wick as in Method 1.
- Melt the total wax in one large pitcher, then divide it equally into three or four separate pitchers while still liquid.
- Color each pitcher with a different crayon color, stirring until fully dissolved. Keep all pitchers warm over the double boiler so none begin to set before you’re ready to pour—partial setting in the pitchers destroys the marble effect.
- Cool all pitchers to the same temperature—around 140°F—before pouring. Consistent temperature across all colors is important for even marble distribution.
- Pour all colors into the jar simultaneously or in rapid succession—pour a little of the first color, then the second, then the third, then the first again, continuing until all wax is poured. The alternating pours naturally create a rough marbled distribution.
- Swirl immediately with a skewer before the wax begins to set. Use two or three slow, sweeping figure-eight movements rather than rapid stirring—over-swirling blends the colors into a muddy brown instead of distinct marble streaks.
- Allow to set completely without touching. The marble pattern sets quickly once the swirling stops—don’t adjust it.
- Top up any sinkholes with white or lightly tinted wax once fully set so the top-up doesn’t disrupt the marble pattern visible through the sides of the jar.
- Trim wick and cure for 48 hours before burning.
Method 4: Crayon Pillar Candle (Best Freestanding Candle)
Pillar candles require higher-melt-point paraffin than container candles—they need to be firm enough to stand alone at room temperature without a container supporting their shape. This method uses pillar-grade paraffin with crayon coloring to produce a freestanding candle that holds its shape and burns with a contained melt pool.
What you’ll need:
- 300g pillar-grade paraffin wax (higher melt point than container paraffin—ask for specifically pillar or votive wax)
- 2–3 crayons in your chosen color
- A pillar candle mold (metal or plastic cylinder molds work best)
- 1 wick specifically sized for the mold diameter, sized up one size from standard
- Mold sealer or putty
- A wick rod or skewer to support the wick through the mold
Instructions:
- Thread the wick through the mold. Most pillar molds have a hole in the base—thread the wick through, tie it around a skewer or wick rod laid across the top of the mold to keep it centered, and seal the bottom hole with mold sealer or putty to prevent leaking.
- Place the mold upright on a level, heat-safe surface. The sealed end is the bottom; the open end faces up for pouring.
- Melt the pillar wax in a double boiler to 170–180°F—slightly higher than container wax due to its higher melt point.
- Add the broken crayon pieces and stir until completely dissolved.
- Add fragrance oil if using and stir for two minutes.
- Pour at 160–170°F—slightly hotter than container candles, as pillar wax needs to be poured warmer to prevent layering lines and cold spots in the finished candle.
- Reserve about 20% of the wax in the pitcher for top-up pours—pillar candles shrink significantly as they cool and almost always need at least two top-up pours.
- Allow to cool for two hours, then use a skewer to poke several holes around the wick into the cooling wax. This releases trapped air and allows the top-up wax to penetrate to the center rather than just sitting on top.
- Pour the reserved wax to fill the sinkhole that has formed. Repeat the poking and top-up process once more after another hour.
- Allow to fully set for 12–24 hours before unmolding. Pillar candles need a longer set time than container candles to develop the structural integrity to stand alone.
- To unmold, turn the mold upside down—the candle should slide out with gentle pressure. If it sticks, place in the freezer for 10–15 minutes to contract the wax slightly.
- Level the bottom by briefly pressing it on a warm baking sheet if it’s uneven.
- Trim wick to ¼ inch and cure for 48 hours.
Method 5: Shaped Crayon Candles Using Silicone Molds (Best for Gifts and Kids’ Projects)
Silicone molds open up an enormous range of shapes—stars, hearts, flowers, animals, geometric forms. Crayon candles in silicone molds are one of the best craft projects for older children and make genuinely impressive gifts. The technique is essentially the same as the pillar method but with a pre-formed mold shape instead of a cylinder.
What you’ll need:
- 200g paraffin wax (pillar or container grade depending on mold depth)
- 2 crayons per color
- Silicone candle molds (baking molds work but candle-specific silicone handles heat better long-term)
- Pre-waxed wick with tab for each cavity
- A pouring pitcher with a narrow spout for accuracy
Instructions:
- Place a wick with tab in the center of each mold cavity. For silicone molds without a wick hole, press the tab firmly to the bottom of the cavity—silicone is flexible enough that the tab will hold during pouring.
- Secure the wick at the top of each cavity by threading through a pencil or centering tool.
- Melt and color the wax following Method 1, using crayon pieces at the standard 5–7% ratio.
- Cool to 130–140°F before pouring into silicone molds—hotter pours can distort flexible silicone molds.
- Pour carefully using a pitcher with a narrow spout to fill each cavity without overflow. Fill to just below the rim of the mold.
- Allow to set fully—at least four to six hours for smaller molds, longer for larger ones.
- Unmold by flexing the silicone gently and peeling away from the wax shape. Silicone releases easily without force.
- Trim wicks to ¼ inch and allow to cure for 24 hours.
For a multi-color effect in shaped molds: Pour the first color to fill half the mold, allow to set, then pour the second color to fill the remaining half. This creates a two-tone effect that shows as a clean color division when the candle burns down.
Method 6: Recycled Crayon Chunk Candle (Best for Using Up Broken Crayons)
This method takes a different approach—instead of fully melting crayons into the wax, it uses chunks of solid crayons embedded in clear or white wax. The crayon pieces remain visible in the finished candle and create a stained-glass effect as the outer wax melts around them during burning. It’s the most visually unique method on this list and the best way to use up a large collection of broken, assorted crayons.
What you’ll need:
- 300g clear or white paraffin container wax (the clear base lets the crayon colors show through)
- A large assortment of broken crayons in various colors—the more colors the better
- 1 large glass jar (16 oz or larger—the bigger the jar, the more dramatic the effect)
- 1 wick with tab, sized up two sizes from standard (the crayon chunks add significant wick load)
- Fragrance oil (optional)
Instructions:
- Prepare the jar and wick as in Method 1.
- Break or cut the crayons into rough chunks—about 1–2cm pieces. Don’t peel them; the paper wrapper burns along with the wax and can affect the flame. Peel all crayons before breaking them into chunks.
- Fill the prepared jar with the crayon chunks in whatever color arrangement you prefer—random mixed looks chaotic and fun; arranged by color or gradient looks more intentional. Pack them in but leave space for the wax.
- Melt the clear or white paraffin without adding any crayon coloring—the color comes from the chunks, not the base wax. Add fragrance oil if using.
- Cool to 130°F—cooler than standard pours to minimize the crayon chunks melting into the base wax and muddying the effect.
- Pour the clear wax slowly over the crayon chunks, allowing it to fill all the gaps between pieces. Pour in a thin, steady stream down the side of the jar to prevent the chunks from shifting.
- Top up immediately if the wax level drops as it fills the gaps—the irregular crayon surface means the first pour often appears lower than expected once the wax settles.
- Allow to cool completely for at least six hours.
- Burn note: As this candle burns, the outer wax melts around the crayon chunks, which gradually melt and blend with the liquid wax pool. The candle changes color and appearance as it burns—early burns show the chunks clearly; later burns create a mixed-color pool. Burn in a container that can handle some color migration.
Crayon Candle Method Comparison
| Method | Skill Level | Visual Effect | Best Wax | Burn Performance |
|---|---|---|---|---|
| Single color container | Beginner | Clean, solid color | Paraffin | Good |
| Layered | Beginner–Intermediate | Horizontal color bands | Paraffin | Good |
| Marbled | Intermediate | Swirled, unique | Paraffin | Good |
| Pillar | Intermediate | Freestanding, bold color | Pillar paraffin | Good |
| Shaped silicone | Beginner | Fun shapes, gifts | Paraffin | Good |
| Recycled chunk | Beginner | Stained glass, dynamic | Clear paraffin | Moderate |
Crayon Color Mixing Guide
One of the most enjoyable parts of crayon candle making is color mixing. Crayons follow standard color mixing rules in wax:
- Red + yellow = orange
- Blue + yellow = green
- Red + blue = purple
- Any color + white crayon = pastel version
- Any color + black crayon = darker, deeper shade (use black sparingly—a tiny amount goes a very long way)
- Complementary colors mixed together = muddy brown (avoid combining red/green, blue/orange, yellow/purple in the same wax unless going for earth tones)
Always test a small amount of melted color on white paper before committing to a full batch—the color looks different in liquid form than it does in the finished solid candle.
Safety Tips for Crayon Candle Making
- Never melt wax directly on a burner. Wax is flammable at high temperatures. Always use a double boiler and keep a fire extinguisher accessible.
- Use a thermometer every time. Overheated wax is a fire hazard—don’t guess the temperature.
- Keep water away from hot wax. Water causes hot wax to splatter violently. If wax catches fire, smother it with a metal lid—never use water.
- Work on a protected surface. Crayon pigment stains permanently. Cover your work area with newspaper or a silicone mat.
- Supervise children. Melting wax and open flames make this a project for adults or closely supervised older children—not a solo kids’ craft.
- Burn test every new formula. Before gifting or using a candle extensively, burn test it for two to three hours, monitoring flame height, melt pool, and any sooting. Adjust wick size if needed.
FAQ
How many crayons do I need per candle? For an 8 oz container candle using paraffin, two to three standard-sized crayons (about 10–15g total) at roughly 5–7% of wax weight produces a vivid, saturated color. More than this risks burn performance issues.
Why does my crayon candle have a weird smell when burning? The crayon pigment and wax binder contribute a distinctive smell that blends with whatever fragrance you add. If the smell is strong and unpleasant, you may have too high a crayon ratio—reduce to 5% and add a stronger fragrance oil to compensate.
Can I use Crayola versus generic crayons? Both work. The pigment composition varies between brands, which means colors may behave slightly differently—some generic crayon colors are less lightfast and may fade faster. For the most consistent results, stick to one brand per batch.
Why does my candle tunnel instead of creating a full melt pool? The wick is too small for the crayon-heavy formula. Size up one or two wick sizes—crayon pigment adds to the wick load and requires a larger wick than plain wax of the same diameter.
The Bottom Line
Crayon candles work beautifully when you treat the crayons as a colorant rather than the primary wax. Keep the crayon ratio at 5–7% of wax weight, size up your wick, use paraffin for the most vibrant colors, and choose your method based on the visual effect you want. Start with Method 1 to get comfortable with how crayon pigment behaves in wax, then move to layered or marbled techniques once you’ve got the basics down. The results—rich, saturated colors at almost zero cost—are genuinely impressive for something you can make in an afternoon from a box of old crayons.
Enjoyed this project? Get even more DIY ideas that save (and make) you money.
Join our free newsletter for profitable DIY projects, clever cleaning hacks, home ideas, and creative crafts delivered straight to your inbox.
✓ Free forever • No spam • Unsubscribe anytime




