
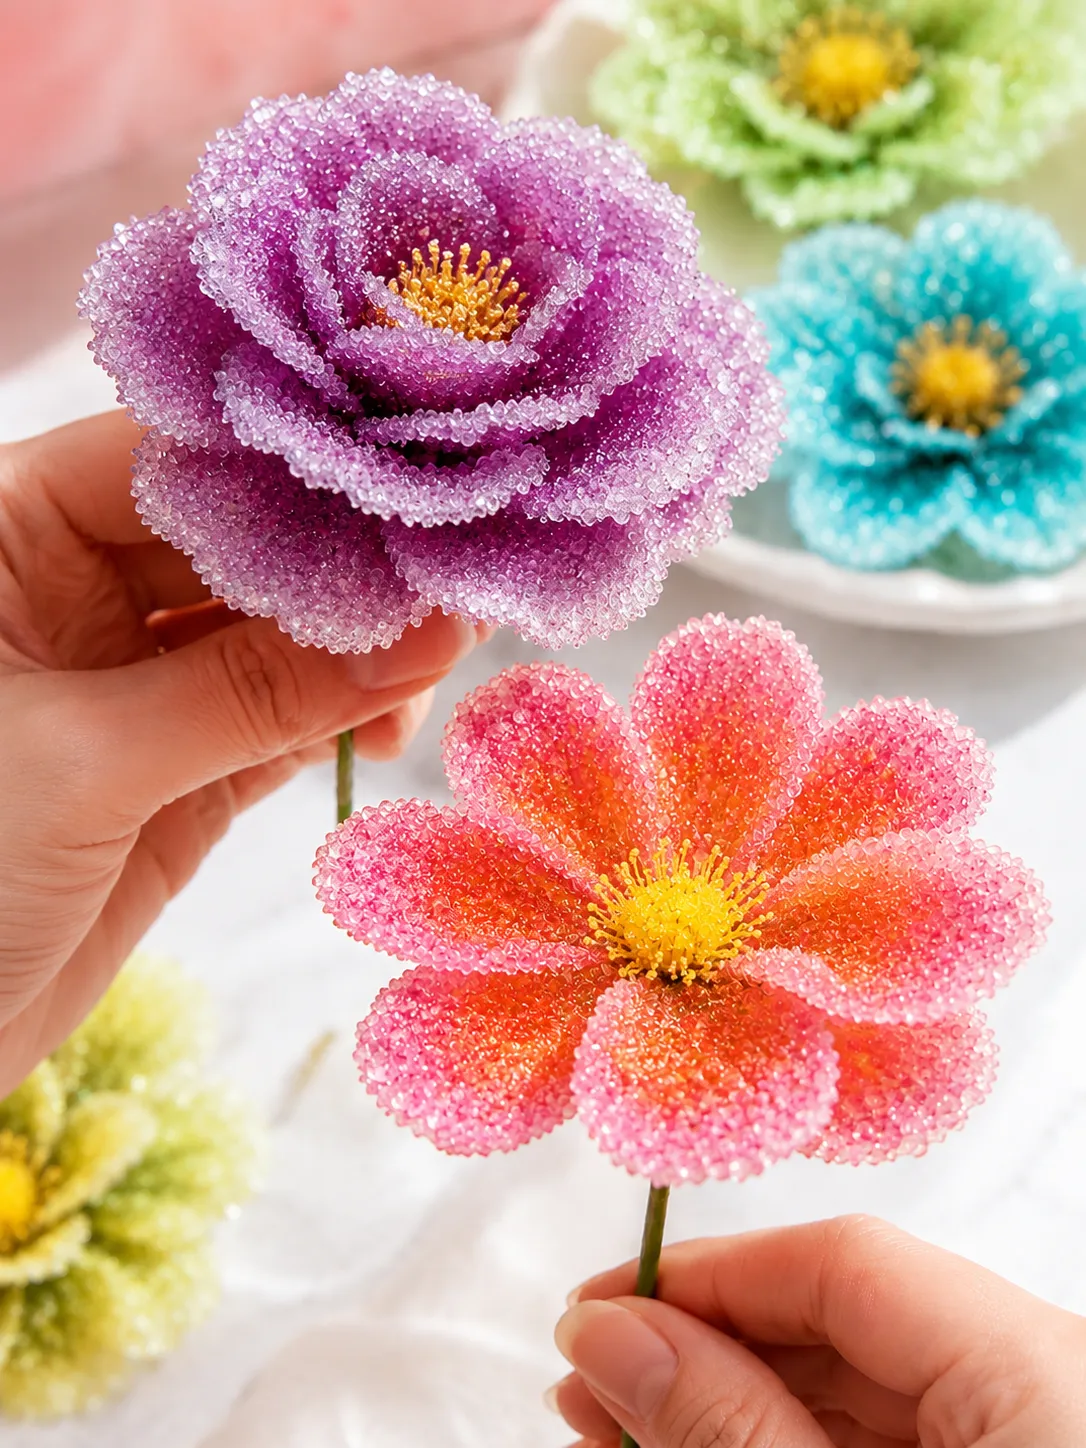
There’s something about seeing a pipe cleaner flower pulled out of a jar completely encrusted in sparkling white crystals that genuinely stops people in their tracks. What went in looking like a simple craft project comes out looking like something that belongs in a museum display case, every petal and stem covered in the same feathery, light-catching crystal formations you’d expect to find deep inside a cave rather than sitting on a kitchen counter overnight.
Borax crystal flowers are one of those rare experiments that deliver on every front simultaneously. The science is real and genuinely interesting, the process is satisfying to watch unfold, and the finished result is beautiful enough to display, give as a gift, or use as a centerpiece that makes people ask how on earth you made it. The fact that the whole thing comes together in under 24 hours using a box of laundry borax and some pipe cleaners makes it even better.
Here’s exactly how to do it from start to finish, including the specific details that separate a sparse, disappointing result from one that looks genuinely spectacular.
The Science Behind the Crystals
Before jumping into the how, it’s worth spending a minute on the why, because understanding what’s actually happening makes the whole experiment more interesting to watch and gives kids a real scientific concept to take away alongside the beautiful finished flower.
Borax crystal growing works on a principle called supersaturation. When you stir borax powder into boiling water, the heat gives the water molecules enough energy to spread apart and hold far more dissolved borax than they ever could at room temperature. The resulting solution is packed with dissolved borax that the water can barely hold onto.
As the solution slowly cools, those water molecules slow down and move closer together again, and they can no longer hold all that dissolved borax in liquid form. The excess borax has to go somewhere, so it comes out of solution as solid crystals, attaching to any surface available to it and building up layer by layer as more and more borax crystallizes out over the following hours.
The pipe cleaner flower provides what scientists call nucleation sites, the tiny fiber surfaces and rough textures that give the very first crystals somewhere to grab onto and begin forming. Once a few crystals are attached, more crystals grow on top of those, and the formation builds outward from those initial attachment points into the branching, feathery structures that make borax crystals so visually distinctive.
This same basic process is responsible for the formation of stalactites and stalagmites in caves, the mineral deposits that form around hot springs, and the crystalline structure of many gemstones, just happening over geological timescales rather than overnight on a kitchen counter.
What You’ll Need
For the flowers:
- Pipe cleaners in white or various colors (white pipe cleaners produce the most dramatic crystal contrast, though any color works)
- Borax powder (found in the laundry aisle of most grocery stores, commonly sold as 20 Mule Team Borax)
- Boiling water
- Wide-mouthed glass jars, one per flower or color
- String or additional pipe cleaner pieces to suspend the flowers
- Pencils or skewers to rest across the tops of the jars
- Food coloring (optional, for tinted crystals)
- Rubber gloves for handling the hot solution
- Paper towels
For optional extras:
- Green pipe cleaners for stems and leaves
- Floral wire for more structured flower shapes
- A vase or display container for the finished crystals
How to Make the Pipe Cleaner Flowers
The flower shapes are what the crystals will grow on, so this step determines what the finished crystal flower looks like. Pipe cleaners are the ideal material here specifically because their fuzzy, textured surface provides an enormous number of nucleation sites for crystals to grab onto, which is why pipe cleaner flowers grow dramatically better crystal coverage than smooth wire or stick versions.
For a simple flower, cut five or six equal lengths of pipe cleaner, each about three inches long, and twist them together at their midpoints to form a starburst shape with petals radiating outward. Bend the end of each petal slightly upward so the finished shape looks like a flower viewed from above rather than a flat starburst. Attach a longer pipe cleaner to the center twist point as the stem.
For a more dimensional flower, shape individual petals by bending each pipe cleaner piece into a rounded teardrop shape before attaching them around a central point. More rounded petals catch crystals differently from flat ones and produce a more three-dimensional finished result.
For roses, wrap a single pipe cleaner into a loose spiral starting from the center outward, then bend the outer edge slightly upward all the way around to create a bowl-shaped rose form. The spiraling shape catches crystals in a way that mimics the layered look of actual rose petals.
Add leaves by twisting short pieces of green pipe cleaner into leaf shapes and attaching them to the stem below the flower head before submerging, since the crystals will grow on the leaves as well and the contrast between the flower and the leafy stem looks particularly striking in the finished piece.
Keep the flower shapes simple and open rather than tightly compacted, since crystals need space to grow outward from each surface and very tightly packed shapes can end up with the crystals fusing together into a single mass rather than showing the individual crystal formations clearly.
Make sure each flower has a length of string or pipe cleaner attached at the top that’s long enough to tie to a pencil resting across the mouth of the jar, since the flower needs to hang suspended in the center of the solution without touching the bottom or sides of the jar.
Making the Borax Solution
This is the most important step in the whole experiment, and the concentration of the solution is the single factor that most determines how dramatic the final crystal growth will be. An under-saturated solution produces sparse, disappointing crystals. A fully saturated solution at boiling temperature produces the dense, dramatic formations worth displaying.
Bring two to three cups of water to a rolling boil in a saucepan. The exact amount depends on the size of your jars and how many flowers you’re making, but you want enough to fully submerge the flower in each jar with some room to spare.
Add borax to the boiling water three tablespoons at a time, stirring after each addition until fully dissolved before adding the next spoonful. Keep adding borax until it simply won’t dissolve anymore and a small amount sits undissolved on the bottom of the pot even after vigorous stirring. This is the point of true saturation, and it’s what you’re aiming for.
If you want tinted crystals, add food coloring to the hot solution now and stir to distribute. Blue, purple, and teal colors tend to show up most vividly in borax crystals since the crystals are naturally white and somewhat translucent. Warmer colors like yellow, orange, and red produce more subtle, pastel-toned results rather than deeply saturated color. Don’t worry if the solution looks very deeply colored at this stage, since the crystals themselves will always be paler than the solution they grew in.
Carefully pour the hot saturated solution into each jar. Let it sit for about five to ten minutes before lowering the pipe cleaner flowers in, since placing them in boiling solution isn’t necessary and can be harder to manage safely.
Setting Up for Crystal Growth
Lower each pipe cleaner flower into a jar of warm borax solution, using the string or pipe cleaner stem tied to a pencil balanced across the mouth of the jar to suspend it in the solution. The flower should be fully submerged and hanging freely, not touching the bottom, the sides, or the walls of the jar at any point.
If you’re making multiple flowers in different colors, set up one jar per color rather than mixing colors in the same jar, since the crystals that grow on each flower will reflect the color of the solution they’re in.
Cover each jar loosely with a paper towel held in place with a rubber band. This keeps dust and debris out of the solution while still allowing some airflow and evaporation, both of which contribute to crystal growth. A completely sealed lid traps humidity and slows the process, so the loose paper towel cover is better than a tight lid even though it feels less tidy.
Place the jars somewhere completely undisturbed where they absolutely won’t be moved, bumped, or shaken for the full growth period. Vibration disrupts crystal formation while it’s happening and produces smaller, less organized results. A shelf, the back of a counter, or a windowsill away from foot traffic are all good options.
Temperature stability matters more than most people realize. Jars placed near heating or air conditioning vents, in direct sunlight that comes and goes through the day, or anywhere with noticeable drafts experience temperature fluctuations that interrupt the steady cooling process and result in smaller crystals. Find the most stable temperature spot in your house and use that, even if it’s not the most convenient location.
Leave the flowers completely undisturbed for a minimum of 12 hours, and ideally 24 hours for the most dramatic, fully developed crystal coverage. Checking on them before this isn’t harmful but does require moving the jars, which is worth avoiding during the growth period.
What to Expect at Different Time Points
Knowing what to expect when removes the temptation to remove the flowers before they’ve reached their full potential, which is one of the most common reasons for disappointing results.
After 2 to 4 hours, you’ll likely see a thin haze on the pipe cleaner surfaces and the beginnings of tiny crystal formations if you look closely. The solution may also look slightly hazier than when you started.
After 8 hours, clear crystal formations should be visible on all surfaces of the pipe cleaner, covering the fuzzy texture with what looks like a sparkly frost. At this point the crystals are real but still small and not at their most impressive.
After 12 hours, the coverage is typically quite dramatic, with full crystal formations covering every surface of the flower and the crystals themselves now large enough to clearly see their individual structure.
After 24 hours, the flowers are at their most spectacular, with layered crystal formations that may have changed the overall size and shape of the flower visibly as the crystals extend outward from every surface.
Leaving the flowers beyond 48 hours doesn’t typically improve the results significantly and in some cases can cause the solution to reabsorb some crystals as conditions change, so removing at the 24-hour mark or once you’re happy with the coverage is the right call.
Removing and Displaying Crystal Flowers
Lift the flower slowly and carefully out of the solution using the string or stem wire, holding it over the jar for a moment to allow excess solution to drip back in rather than onto your work surface.
Place the flower on a paper towel to drain without touching the crystal surfaces directly. Wet borax crystals are more fragile than dry ones and can chip or break off under even light finger pressure, so handling carefully during this stage matters more than at any other point.
Allow the flower to dry completely on the paper towel for at least one to two hours before any direct handling of the crystal surfaces. The crystals become noticeably more solid and durable once fully dry.
For display, arrange multiple crystal flowers together in a vase or display container, adding green crystal leaves or plain green pipe cleaner stems for contrast. A small white vase or a glass container shows off the crystal flowers particularly well since it doesn’t compete visually with the sparkle of the formations.
For longer-term display, a very light spray of clear acrylic sealer from about 12 inches away helps protect the crystal formations from chipping and from humidity-related dissolution without significantly changing how they look or how they catch light.
Fun Variations to Try
Rainbow crystal flowers make a set of identical flowers, one in each color of the rainbow, using the same pipe cleaner base shapes in seven separate colored solutions. Displayed together in a vase or arranged in an arc they make a dramatic rainbow centerpiece.
Giant crystal flowers use much larger pipe cleaner flower shapes, extending the petals further outward and making the flowers two or three times the standard size. The crystals that grow on larger shapes are the same size as on smaller ones, which means the contrast between the size of the flower and the fine detail of the individual crystals looks particularly impressive.
Glowing crystal flowers use tonic water as the base for dissolving the borax, following the same method otherwise. Tonic water contains quinine, which glows blue-white under UV light, and that glow is captured in the crystals themselves as they form. Under normal light the flowers look identical to regular borax crystal flowers, but under a blacklight they glow in a way that looks genuinely magical.
Crystal bouquet combines crystal flowers with crystal seashells and crystal leaves in a single arranged display, using borax crystals grown on different base materials to create a varied, interesting botanical-style display piece.
Wire-shaped flowers use floral wire instead of pipe cleaners for the basic flower shape, then wrap sections of the wire in cotton thread or fine yarn before submerging. The thread provides the nucleation sites the smooth wire alone can’t offer, while the wire allows for more precise and complex flower shapes than pipe cleaner alone makes possible.
Quick Fixes for Common Problems
| Problem | Potential Solution | Alternative Approach |
|---|---|---|
| Very little crystal growth after 12 hours | Solution wasn’t saturated enough—remake at boiling temperature adding borax until no more will dissolve | Move the jar to a cooler location, since faster cooling sometimes produces better crystal attachment in the early hours |
| Crystals growing on the jar but not the flower | Pipe cleaner texture isn’t rough enough to compete with the glass nucleation sites—try roughing up the pipe cleaners with sandpaper | Paint a thin layer of the borax solution onto the pipe cleaner before submerging and let it dry to create seed crystals |
| Crystal coverage is uneven | Flower is touching the jar wall somewhere—reposition so it hangs completely free of all surfaces | Very gently rotate the flower once in the first hour before any crystals have firmly attached |
| Crystals look very white even with food coloring | Borax crystals are naturally white and opaque—add significantly more food coloring next time | Blue and purple produce the most visible tint—try switching to these colors for a more obviously colored result |
| Crystals fell off when removing the flower | Lifted too quickly or touched the crystal surface while wet—lift very slowly using only the string and wait two hours before touching | Let the flower hang at the surface of the solution for a few minutes before fully removing, giving loosely attached crystals a chance to reattach |
| Solution went cloudy or murky during growth | This is normal and doesn’t affect the crystals—it means the solution is releasing borax which is exactly what you want | Strain through a coffee filter if you want to check the solution clarity, but murky solution still grows excellent crystals |
Using This as a Science Fair Project
Borax crystal flowers offer a lot of scope for structured experimentation that works well as a science fair project, since the basic setup is simple enough to repeat multiple times with controlled variables.
Does temperature affect crystal size? Set up identical flowers in identical solutions at two different temperatures, one in a warm spot and one in a cool spot, and compare the size of individual crystals after the same growth period.
Does solution concentration affect growth speed? Make one jar at full saturation and one at half saturation and compare both how quickly visible crystals appear and how much coverage develops at the 12-hour mark.
Does the base material affect crystal coverage? Compare pipe cleaner, cotton string, wire wrapped in thread, and smooth wire placed in identical solutions simultaneously and compare coverage after 24 hours.
For a properly structured experiment, write a hypothesis before starting each variable test, record observations at regular timed intervals, and write a conclusion comparing the results to the original hypothesis. Photographs taken at the same time each day provide clear visual documentation of how different conditions affect the outcome.
FAQ
Is borax safe to use for this experiment?
Borax is a naturally occurring mineral compound that’s been used in households for many years. It should be handled with sensible precautions during preparation, specifically keeping the hot solution away from children and not inhaling the powder when measuring it out. The finished dry crystals are stable and safe to handle normally, though they shouldn’t be put in the mouth. Adult supervision and involvement is essential for the boiling water and solution preparation steps.
How long do borax crystal flowers last?
Stored in a dry environment away from high humidity, borax crystal flowers last indefinitely. The main thing that degrades them over time is high humidity, since borax is mildly hygroscopic and can slowly absorb atmospheric moisture in very humid conditions, which gradually softens and eventually dissolves the crystal formations. A sealed display case or a light coat of clear acrylic sealer prevents this effectively.
Can I make the solution in advance and store it?
The borax solution is best used fresh and hot, since the whole point is to create a supersaturated solution that then slowly cools. Making it in advance and reheating it works fine, but you’ll need to add more borax when reheating to restore full saturation since some borax will have crystallized out of the cooled solution overnight.
Why do the crystals look white rather than clear like glass?
Borax crystals are naturally white and semi-opaque due to the way borax molecules pack together and scatter light during crystallization. This is different from minerals like alum which grow in clear, transparent crystals. The white color of borax crystals is actually part of what makes them look so striking against colored pipe cleaners and why they catch light so beautifully.
My flower sank to the bottom of the jar. Does that matter?
Yes, a flower resting on the bottom of the jar will have flat, crystal-free patches wherever it contacts the glass, since crystals can’t grow in the space between the flower and the jar surface. Reattach the string to suspend it properly and start again with fresh solution for the best results.
Can I do this experiment with younger children?
The crystal growing process itself is safe for children of any age to observe and participate in at appropriate stages. The hot solution preparation is strictly an adult task, and younger children should observe that part from a safe distance. Shell handling during setup and flower shaping beforehand are great steps for younger kids to be actively involved in.
Conclusion
DIY borax crystal flowers earn their reputation as one of the most satisfying science experiments you can do at home because the gap between how simple the process is and how impressive the result looks is genuinely remarkable. Twist some pipe cleaners into flower shapes, stir borax into boiling water until it won’t dissolve any more, hang the flowers in the solution overnight, and let the chemistry do the rest. What comes out of the jar 24 hours later consistently surprises people who are expecting something modest and discovers instead something that genuinely looks like it took considerable skill or specialized equipment to produce. It didn’t. It just took borax, boiling water, and overnight patience.
Enjoyed this project? Get even more DIY ideas that save (and make) you money.
Join our free newsletter for profitable DIY projects, clever cleaning hacks, home ideas, and creative crafts delivered straight to your inbox.
✓ Free forever • No spam • Unsubscribe anytime




