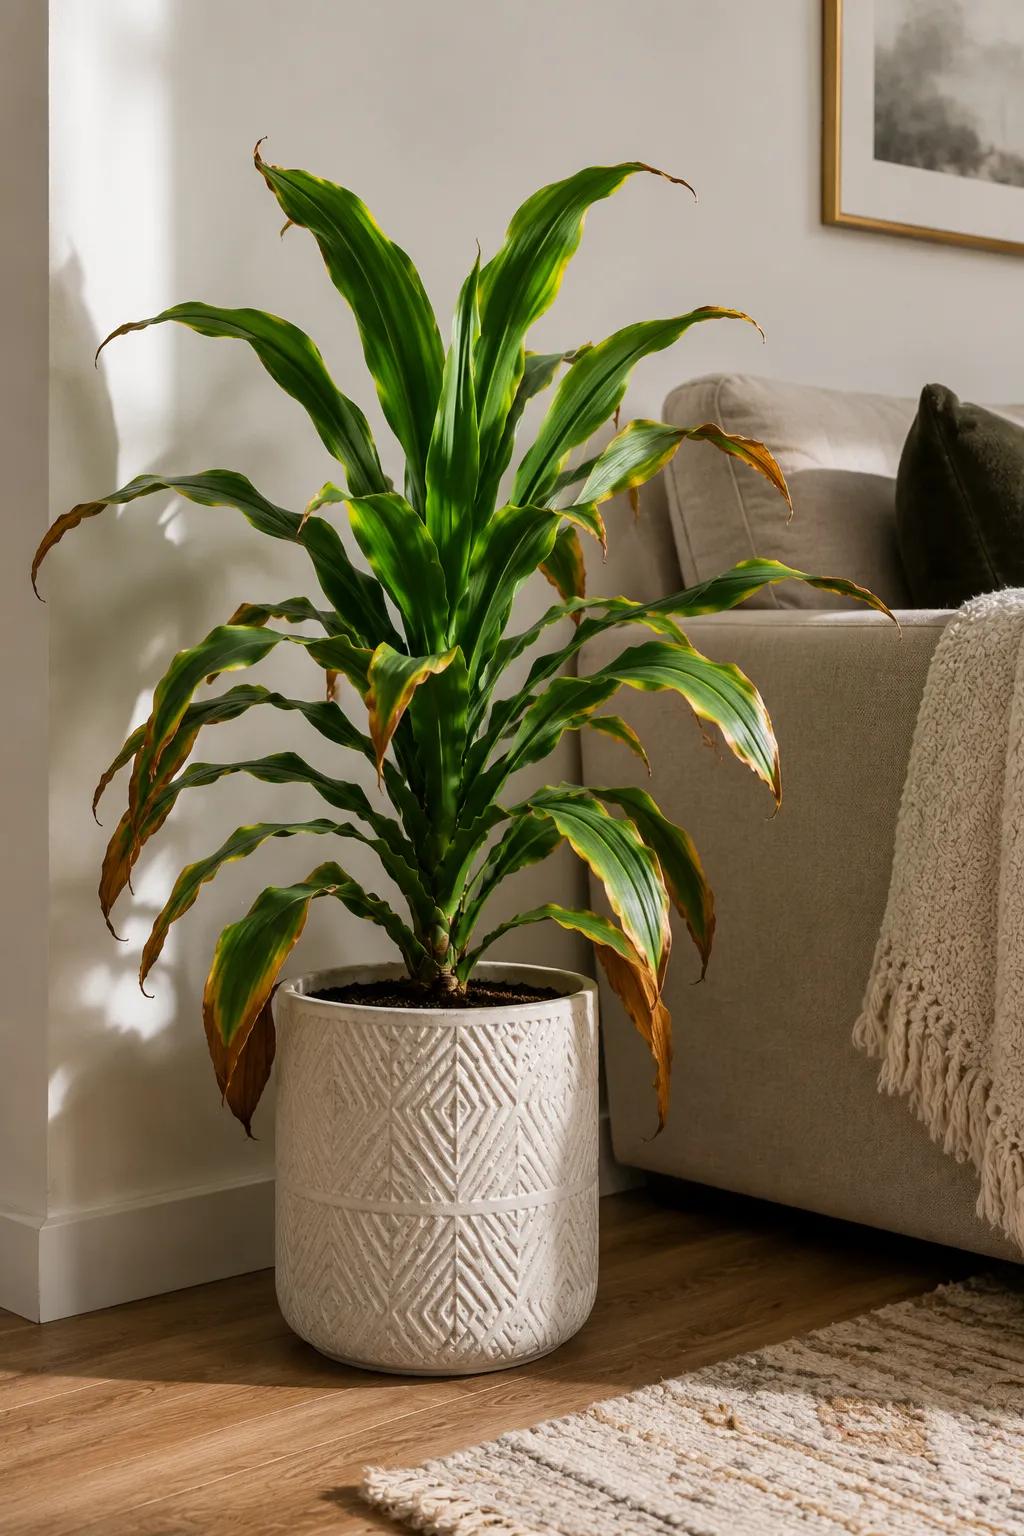
You picked a corn plant—also known as Dracaena fragrans—because it looked lush, tropical, and low-maintenance. And it is, mostly. But “low-maintenance” doesn’t mean “zero maintenance,” and corn plants have a handful of specific needs that, when missed, cause a very recognizable and rapid decline.
The frustrating part is that most people misread the symptoms and apply the wrong fix. They see brown tips and water more. They see yellowing and add fertilizer. Both responses often make the situation worse.
Here’s how to accurately diagnose what’s wrong with your corn plant and bring it back the right way.
Here’s the Real Reason Your Corn Plant Is Dying
Corn plants are tropical understory plants by nature—they evolved growing beneath forest canopies in filtered light with well-draining, organically rich soil. When you replicate those conditions at home, they thrive. When you don’t, they decline in very predictable ways.
The most common causes of a dying corn plant:
- Overwatering. This is the number one killer. Corn plants need the soil to partially dry out between waterings. Consistently wet soil leads to root rot, which presents as yellowing leaves and a soft, mushy base.
- Fluoride toxicity. Like bamboo and spider plants, Dracaena is highly sensitive to fluoride in tap water. It accumulates in the leaf tissue and causes the distinctive brown, crispy tips that most people mistake for underwatering.
- Low humidity. Corn plants are tropical. Indoor air—especially in winter with heating running—is far drier than they prefer, leading to brown edges and tip dieback.
- Insufficient light. Deep shade causes slow, weak growth and eventual yellowing. Corn plants need bright, indirect light to stay healthy.
- Too much direct sunlight. Harsh direct sun bleaches and scorches the leaves, causing pale patches and brown streaks.
- Temperature stress. Drafts from windows, cold air from air conditioning, or temperatures below 55°F (13°C) cause rapid leaf drop and overall decline.
- Compacted or depleted soil. Over time, potting mix breaks down, loses structure, and stops draining properly—creating conditions that stress the roots even with correct watering habits.
- Pests. Spider mites, scale insects, and mealybugs are common on corn plants and can cause significant damage before they’re even noticed.
Don’t Ignore These Warning Signs
Corn plants communicate stress clearly if you know what to look for. Catching problems early dramatically improves recovery odds.
- Brown, crispy leaf tips — Almost always fluoride toxicity or low humidity, not underwatering.
- Yellow lower leaves — Natural if it’s just one or two older leaves at the base; widespread yellowing points to overwatering or root rot.
- Pale, washed-out leaf color — Too much direct sunlight or severe nutrient deficiency.
- Soft, mushy stalk at the base — Root rot has progressed into the stem itself; requires urgent action.
- Drooping or wilting leaves — Underwatering, root rot, or temperature shock.
- Sticky residue on leaves — Pest infestation, likely scale or mealybugs.
- Fine webbing on undersides of leaves — Spider mites; act immediately before they spread.
- Sudden leaf drop — Temperature shock, cold draft, or severe root stress.
- No new growth for many months — Rootbound conditions, nutrient depletion, or insufficient light.
Stop Doing This to Your Corn Plant
These common habits quietly push corn plants toward decline, and most plant owners don’t realize it until the damage is already significant:
Watering on a fixed schedule. Corn plants don’t need water every week automatically. Soil moisture varies by season, pot size, humidity, and temperature. Watering before the top inch or two of soil has dried out keeps the roots in perpetually damp conditions—which is exactly where root rot begins.
Using tap water directly. Fluoride sensitivity is real and cumulative in Dracaena. The brown tips don’t appear immediately; they develop over weeks and months of fluoride buildup. By the time the damage is visible, the plant has been dealing with toxicity for a while. Switching to filtered or distilled water—or simply leaving tap water in an open container overnight—makes a noticeable difference over time.
Placing it in deep shade. Corn plants tolerate lower light better than many houseplants, but “tolerates” isn’t the same as “thrives.” A corn plant stuck in a dim hallway or far corner will slowly weaken, become pale, and lose its ability to fight off pests and disease.
Cutting brown tips with jagged cuts. Most people tear or cut brown tips irregularly, which leaves ragged edges that quickly brown again. Trimming parallel to the natural leaf shape with clean, sharp scissors gives a cleaner result that doesn’t re-brown as quickly.
Repotting into an oversized container. When a corn plant needs repotting, the instinct is to go much bigger. But excess soil volume holds excess moisture, which creates the wet-root conditions corn plants hate. Go only one pot size up at a time.
What You’ll Need
Gather these before you start assessing and treating the plant:
- Distilled or filtered water (or tap water left out 24 hours)
- Well-draining potting mix — a blend of regular potting soil with added perlite works well
- A clean pot with drainage holes, one size up from the current container if repotting is needed
- Sterilized pruning shears or sharp scissors
- Rubbing alcohol for sterilizing tools and treating pest spots
- Neem oil or insecticidal soap if pests are present
- Balanced liquid fertilizer — diluted to half strength, used only during active growing season
- A pebble tray or small humidifier to increase ambient humidity
Step-by-Step: How to Save a Dying Corn Plant
Step 1: Take the plant out of its pot and inspect the roots. Don’t skip this step, even if you’re not planning to repot. Gently ease the plant out and examine the root system closely. Healthy roots are white or light tan and firm. Rotted roots are dark brown or black, soft, and may have an unpleasant smell. The extent of root damage tells you how serious the situation is and what level of intervention is needed.
Step 2: Remove all rotted roots with sterilized scissors. Cut back to where the root tissue is clean, firm, and healthy. If you’re cutting through root tissue, sterilize the blades with rubbing alcohol between cuts to avoid spreading any fungal contamination to healthy tissue.
Step 3: Treat the remaining roots and cut surfaces. Dust trimmed areas lightly with ground cinnamon or powdered activated charcoal—both act as natural antifungals and help the wounds seal before the plant goes back into soil. Allow the roots to air dry for one to two hours before repotting.
Step 4: Repot in fresh, well-draining mix. Fill the bottom of a clean pot with fresh succulent-friendly or well-draining potting mix. Position the plant so the base sits at roughly the same depth it was before. Fill in around the roots gently without compacting the soil—the roots need air as much as they need water.
Step 5: Remove all visibly damaged leaves and stems. Using clean, sharp scissors, trim away leaves that are more than half brown or yellow—they won’t recover and they drain the plant’s energy. For leaves with just brown tips, trim the tips at a slight angle following the natural leaf shape, cutting just into the green tissue to get a clean line.
Step 6: Switch to filtered or distilled water going forward. From this point on, replace tap water with filtered, distilled, or 24-hour-rested water for every watering. This alone won’t reverse existing fluoride damage, but it stops the accumulation and allows the plant to recover without continued chemical stress.
Step 7: Water correctly from here on. Push your finger two inches into the soil. If it feels even slightly cool or damp, wait. Water only when the top two inches are fully dry. When you do water, water deeply and slowly until it drains from the bottom, then don’t water again until the soil dries out to that same depth.
Step 8: Move it to the right light position. Place the corn plant near a window that receives bright, indirect light. An east-facing window or a spot a few feet back from a south- or west-facing window is ideal. Keep it away from cold drafts, heating vents, and air conditioning units—temperature consistency matters more to corn plants than most people realize.
Step 9: Address pests if present. If you spotted webbing, sticky residue, or tiny insects during your inspection, treat immediately. Wipe down all leaf surfaces with a cloth dampened with diluted neem oil or insecticidal soap, paying special attention to the undersides of leaves where pests congregate. Repeat every five to seven days for three weeks to break the pest life cycle completely.
Step 10: Increase humidity around the plant. Set the pot on a tray filled with pebbles and a shallow layer of water—the evaporation creates a pocket of higher humidity around the leaves. Alternatively, grouping it with other houseplants or using a small humidifier nearby helps maintain the moisture level corn plants prefer.
Step 11: Hold off on fertilizer until recovery is visible. Resist the urge to feed a stressed plant. Fertilizer salts can burn weakened roots and set back recovery. Wait until you see clear signs of new growth—typically new leaves emerging from the central growth point—before introducing any feeding. When you do fertilize, use a diluted liquid fertilizer at half the recommended strength, and only during the active growing season (spring through early fall).
You’re Probably Doing This Wrong: Diagnosing Brown Tips vs. Yellow Leaves
Brown crispy tips and yellow leaves look like related problems but they almost always have different causes and need different responses. Brown tips on an otherwise green, firm leaf almost never mean the plant needs more water—they mean fluoride toxicity or low humidity. Yellow leaves on a drooping plant almost always mean too much water or root rot. Treating brown tips with more water, or treating yellowing with less water, are two of the most common misdiagnoses in corn plant care. Diagnose first, then act.
Quick Reference: Symptoms and Fixes
| Symptom | Likely Cause | Fix |
|---|---|---|
| Brown, crispy leaf tips | Fluoride toxicity or low humidity | Switch to filtered water, add pebble tray |
| Widespread yellowing | Overwatering or root rot | Inspect roots, repot in fresh dry soil |
| Pale, bleached patches | Too much direct sun | Move to bright indirect light |
| Soft, mushy stalk base | Advanced root rot | Trim rot, treat with cinnamon, repot immediately |
| Drooping despite moist soil | Root rot preventing water uptake | Unpot, inspect, and treat roots |
| Sticky leaves or webbing | Pest infestation | Neem oil or insecticidal soap, repeat weekly |
| No new growth for months | Rootbound or nutrient-depleted | Repot one size up, resume diluted feeding |
| Sudden leaf drop | Temperature shock or cold draft | Move away from vents and cold windows |
FAQ
Can a corn plant recover from root rot? Yes, if enough healthy root tissue remains. The key is acting quickly—removing all rotted roots, letting the plant dry slightly, and repotting in fresh, dry, well-draining soil. Plants with even a small network of healthy roots can rebuild if the conditions improve.
Why does my corn plant keep getting brown tips even after I switched to filtered water? Fluoride damage that’s already present won’t reverse—those brown areas stay brown. But switching water stops new damage from accumulating. If browning continues on new growth after the switch, check humidity levels and make sure the plant isn’t sitting near a heating or cooling vent.
How much light does a corn plant actually need? Bright, indirect light for at least six hours a day is ideal. It will survive in lower light, but growth slows significantly and the plant becomes more vulnerable to stress and pests. Direct harsh sunlight, particularly afternoon sun through a window, causes bleaching and scorch marks.
Should I mist my corn plant? Misting offers only temporary, minimal humidity benefit and can leave water marks on the leaves or encourage fungal issues if the leaves stay wet. A pebble tray or small humidifier nearby is a more effective and consistent solution.
How fast does a corn plant grow back after treatment? Under good conditions, new leaf growth typically appears within four to eight weeks of correcting care. Full visual recovery from significant damage—where the plant looks lush and full again—can take three to six months depending on how extensive the original damage was.
Conclusion
Saving a dying corn plant almost always comes down to two things: diagnosing the actual problem rather than guessing, and then correcting the root cause rather than treating the symptoms. Stop using tap water, check soil moisture before every watering, get the light right, and deal with pests the moment you spot them. If root rot is present, address it directly—repot with fresh soil, trim the damage, and give the plant time and space to recover. Corn plants are genuinely resilient when their basic needs are met. Get those right, and most will come back stronger than before.
Enjoyed this project? Get even more DIY ideas that save (and make) you money.
Join our free newsletter for profitable DIY projects, clever cleaning hacks, home ideas, and creative crafts delivered straight to your inbox.
✓ Free forever • No spam • Unsubscribe anytime