
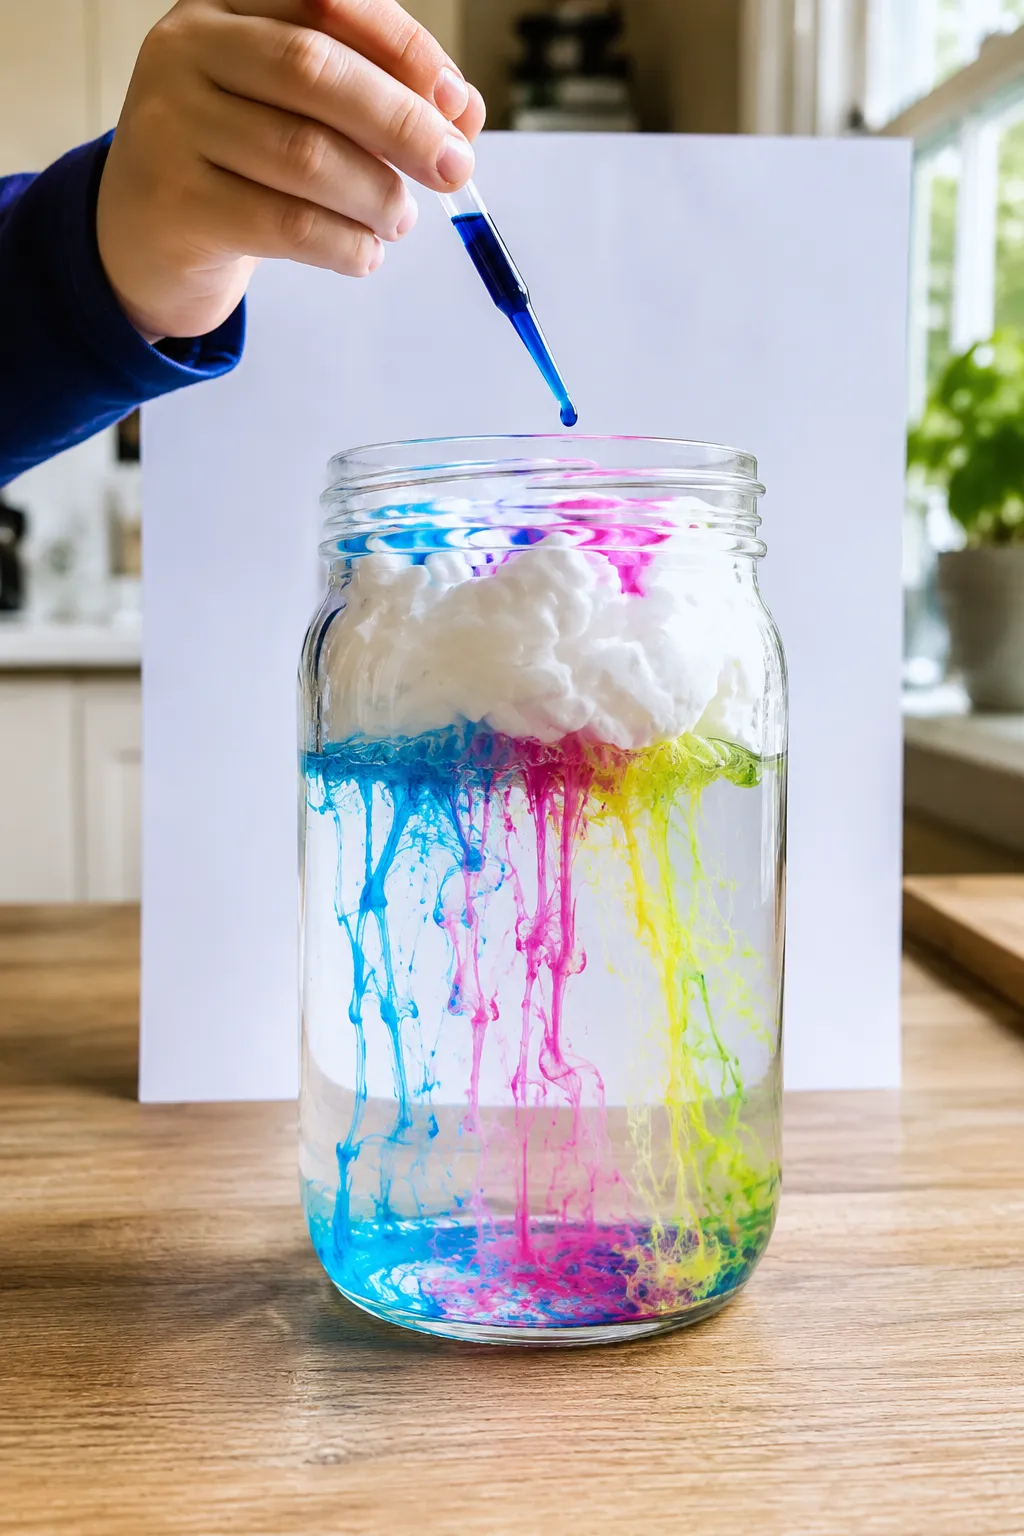
Few science experiments produce a reaction quite like this one. You’re watching a jar of colored water sit still, and then—slowly, dramatically—streams of color begin falling through a white layer like rain falling from a cloud. It looks like something from a nature documentary, happening in a glass jar on your kitchen counter.
The rain cloud in a jar experiment is one of the most visually satisfying science demonstrations you can do at home or in a classroom. It requires almost nothing, takes about ten minutes to set up, and the result is genuinely beautiful. More importantly, the science behind it is real, applicable, and worth understanding—it’s not just a pretty trick.
Watch this short video to learn how to make a rain cloud in a jar:
Here’s everything you need to know to make it work perfectly on the first try.
Here’s the Real Reason the “Rain” Forms
Understanding the mechanism makes the experiment more interesting and helps you troubleshoot if something doesn’t go quite right.
The experiment demonstrates two scientific principles simultaneously: density and diffusion.
The white layer sitting on top of the water is shaving cream, which acts as the “cloud.” It’s less dense than water, so it floats. The colored water you add on top of the shaving cream is denser than the foam—but the foam initially holds it up because of surface tension within the shaving cream’s structure.
As more colored water is added, the weight of the liquid slowly overcomes the surface tension holding it in the foam. When a pocket of colored water becomes heavy enough, it breaks through the bottom of the shaving cream layer and sinks into the clear water below—exactly like water droplets forming at the base of a saturated cloud and falling as rain.
The falling streams of color are also affected by diffusion—the tendency of particles to move from areas of higher concentration to lower concentration—which is why the color spreads outward as it falls rather than dropping in a single straight line.
This is a legitimate model of how precipitation forms in real clouds. Real clouds hold water droplets suspended in ice crystals and water vapor. When the droplets become heavy enough that air resistance can no longer support them, they fall as rain. The shaving cream and colored water replicate this density-threshold concept in a visible, immediate way.
Don’t Ignore the Setup Details
The difference between a dramatic, beautiful result and a disappointing muddy-colored jar almost always comes down to setup. These details matter:
Use a tall, clear glass jar or container. The taller the jar, the more dramatic the falling color streams look as they travel down through the clear water. A mason jar, a large drinking glass, or a clear vase all work well. Avoid short, wide containers—the streams don’t have room to develop visually.
Use room-temperature or slightly warm water. Cold water is denser and creates more resistance for the colored water breaking through the shaving cream. Slightly warm water allows the color to fall more freely and produces more dramatic streams.
Let the shaving cream settle before adding color. Rushing this step is the most common mistake. The shaving cream needs at least one to two minutes to stabilize and form a coherent layer before you add anything on top of it.
Use concentrated color. Diluted food coloring produces pale, hard-to-see streams. Use enough drops to make a deeply saturated color in whatever small container you’re mixing in.
What You’ll Need
Everything on this list is either already in your home or costs very little:
- A tall, clear glass jar or container — a mason jar or large drinking glass works perfectly
- Water — room temperature or slightly warm
- White shaving cream — the foam variety, not gel (gel doesn’t work; it doesn’t form the right cloud-like layer)
- Liquid food coloring — at least two or three colors for a more dramatic effect
- Small cups or containers — for mixing colored water before adding to the jar
- A dropper, pipette, or spoon — for adding color slowly and precisely to the shaving cream surface
- White paper or a plain background — placing this behind the jar makes the color streams much easier to see and photograph
Stop Doing This if You Want Clear, Dramatic Results
Using shaving gel instead of shaving foam. This is the most common substitution mistake. Shaving gel is transparent, thin, and doesn’t form a stable layer on top of the water. It sinks almost immediately and mixes with the water rather than forming a cloud layer. The experiment won’t work with gel. It must be foam—the white, opaque, aerated kind.
Adding color directly from the bottle. Dropping food coloring straight from the bottle onto the shaving cream places too much concentrated dye in one spot too quickly. The weight of the liquid overwhelms the shaving cream’s surface tension immediately and the color falls through before you can see the gradual buildup effect. Mix your colors with a small amount of water first, then add them slowly.
Stirring or disturbing the jar after setup. Once the shaving cream layer is in place, any movement of the jar disrupts the boundary between the foam and the water below. Even gentle swirling can break the effect before it starts. Set the jar somewhere stable and leave it completely still.
Adding all the color at once and expecting to wait. The effect requires patience. Add color gradually, a few drops at a time, and wait between additions. The slow buildup is what creates the dramatic breaking-through-the-cloud moment. Dumping a large amount at once just produces a muddy mess.
Using a short or wide container. The falling streams of color need vertical space to develop and be visible. A shallow container compresses the effect into a few centimeters and produces a much less dramatic result.
Step-by-Step: Rain Cloud in a Jar Experiment
Step 1: Fill your jar about two-thirds full with room-temperature water. Leave enough space at the top for the shaving cream layer—you need at least two to three inches of clearance above the water line. Clear water is important; any cloudiness in the water makes the falling color streams much harder to see.
Step 2: Spray a layer of shaving cream on top of the water. Hold the shaving cream can just above the water surface and spray a layer approximately one inch thick across the entire surface. The shaving cream will float on top of the water. Use enough to create a full, even coverage—thin or patchy shaving cream doesn’t hold color as effectively. Avoid pressing down on the shaving cream or trying to shape it; let it settle naturally.
Step 3: Wait two minutes before adding any color. Set a timer and genuinely wait. The shaving cream needs time to stabilize into a cohesive layer. Adding color before it settles means the foam is still shifting and the color will break through unevenly or too quickly.
Step 4: Mix your colors in small separate cups. In each small cup, mix five to ten drops of food coloring with one to two teaspoons of water. Stir to combine. You want the color to be deeply saturated—pale colors produce pale results. Prepare at least two or three colors for a more visually interesting experiment.
Step 5: Slowly add drops of colored water onto the shaving cream surface. Using a dropper, pipette, or the tip of a spoon, place small amounts of colored water gently onto the shaving cream. Don’t concentrate all the color in one spot—spread drops of each color across different areas of the foam surface. Add a few drops of one color, then move to another color, then return to the first. The goal is a gradual buildup of color across the cloud layer.
Step 6: Continue adding color slowly and watch the bottom of the shaving cream layer. As color accumulates on top of the foam, watch carefully at the point where the shaving cream meets the water below. This is where the action happens first. After a few minutes—the exact timing varies based on water temperature, shaving cream thickness, and color concentration—you’ll see the first tendrils of color begin to break through the foam layer and drift downward through the water.
Step 7: Keep adding color to maintain the effect. Once the first streams appear, continue adding colored water to the top of the shaving cream. Different colors breaking through at different points create overlapping streams that fall and diffuse through the clear water below—the full rain cloud effect. The more colors you use and the more gradually you build up the layers, the more complex and beautiful the result.
Step 8: Place a white background behind the jar for the best visibility. If you’re photographing this or doing it as a classroom demonstration, a sheet of white paper behind the jar makes the color streams dramatically more visible. Natural light from a window hitting the jar from the side also enhances visibility significantly.
You’re Probably Doing This Wrong: The Patience Factor
The rain cloud experiment rewards patience more than almost any other kitchen science project. The temptation to add a lot of color quickly—especially with children watching—is understandable. But the most visually dramatic version of this experiment happens when color is added gradually over five to ten minutes, building up slowly in the cloud layer until multiple streams are falling simultaneously in different colors at different rates. Rushing produces a result that’s over in 30 seconds. Taking your time produces something that looks genuinely like weather happening in a jar.
Variations Worth Trying
The layered density column version: Before adding the shaving cream, create a layered density column in the jar using liquids of different densities—honey at the bottom, then corn syrup, then dish soap, then water. Add the shaving cream on top and colored water above that. The rain falls through the water layer and stops at the dish soap layer, demonstrating density differences between liquids visually.
The multiple cloud version: Use a wider container and create two or three separate shaving cream “islands” on the water surface with small gaps between them. Add different colors to each cloud and watch them develop separately before the streams eventually meet in the water below.
The cold vs. warm water comparison: Set up two identical jars simultaneously—one with cold water and one with warm water. Add the same amount of the same color to both at the same time. The color breaks through the shaving cream and falls through the warm water noticeably faster, visually demonstrating how temperature affects water density and molecular movement.
The overnight version: After the initial rain effect is done, leave the jar undisturbed overnight. By the next morning, diffusion will have distributed the colors throughout the entire jar in a way that’s often more beautiful than the original experiment—swirling gradients of color throughout the water with the shaving cream still floating above.
Connecting the Experiment to Real Weather
This experiment models real atmospheric science more accurately than most kitchen experiments manage:
Cloud saturation: Real clouds form when water vapor condenses around tiny particles (dust, pollen, sea salt) in the atmosphere. A cloud can hold water droplets suspended until the droplets grow large enough—through collision and coalescence with other droplets—that gravity overcomes air resistance. The shaving cream holding colored water until it becomes heavy enough to fall is a direct physical analogy.
Precipitation types: The rate at which color falls through the water roughly models different precipitation intensities. A slow, gradual seeping of color through the foam is like light drizzle. A sudden breakthrough of heavily saturated color that falls in clear streams is more like a heavy downpour.
Cloud color: Real clouds look white because the water droplets inside scatter all wavelengths of light equally. Dark storm clouds appear gray or black because they’re so thick that light can’t penetrate through—the shaving cream, similarly, looks white when thin and takes on color as it becomes saturated.
Quick Reference: Troubleshooting
| Problem | Likely Cause | Fix |
|---|---|---|
| Color sinks immediately without streaming | Shaving cream too thin or gel used instead of foam | Use more foam shaving cream, ensure it’s the foam variety |
| Nothing happens after 10 minutes | Color too diluted or shaving cream too thick | Use more concentrated color, add more colored water gradually |
| Water turns uniformly cloudy | Too much color added too fast | Start over, add color more slowly next time |
| Shaving cream sinks into water | Water too warm or cream disturbed | Use cooler water, don’t disturb the jar after setup |
| Color streams not visible | Container too short or background too dark | Use a taller jar, place white paper behind it |
| Effect over too quickly | Too much color added at once | Add smaller amounts more gradually |
FAQ
What age is the rain cloud experiment appropriate for? The basic experiment is suitable for children as young as three or four with adult supervision—the visual effect is immediately engaging even for very young children. The scientific explanation of density, diffusion, and precipitation modeling is most appropriate for elementary through middle school age. High school students can extend it into quantitative explorations of density gradients and diffusion rates.
Can I use something other than shaving cream? Whipped cream works and produces a similar effect, though it breaks down faster and the experiment has a shorter window. Foam soap sometimes works but varies significantly by brand. Shaving foam is the most reliable and consistent option by a significant margin.
Why do some colors fall faster than others? Different food coloring formulations have slightly different densities and viscosities. Darker, more concentrated colors also tend to be heavier per unit volume and break through faster. This variation is actually scientifically interesting—it mirrors how different types of precipitation (snow vs. rain vs. hail) fall at different rates based on density.
How long does the effect last? The active rain effect—color visibly falling through the water—typically lasts 10 to 20 minutes from when the first streams appear, depending on how much color is added and how gradually. The jar remains visually interesting for hours afterward as diffusion continues to move color through the water.
Can I reuse the jar for another experiment? Once the color has fully diffused through the water, the jar needs to be emptied and cleaned before reuse. The shaving cream dissolves into the water over time and can’t be separated out again. Starting fresh with clean water and new shaving cream gives the best results.
Does it work with saltwater? Yes—and interestingly, saltwater’s higher density means the color takes slightly longer to break through the shaving cream layer, extending the buildup period and often producing a more dramatic breakthrough when it does happen. This is a useful variation for demonstrating how ocean water behaves differently from fresh water.
Conclusion
The rain cloud in a jar experiment works because the science is real—density differences, surface tension, and diffusion all play genuine roles in producing the effect, and they’re the same principles that govern actual precipitation in the atmosphere. Foam shaving cream, concentrated food coloring, room-temperature water, and patience are genuinely all you need. Take your time adding the color, use a tall clear jar with a white background behind it, and don’t rush the buildup. The moment the first stream of color breaks through the cloud and drifts down through the water is one of those rare science experiment results that surprises people every single time, regardless of age.
Enjoyed this project? Get even more DIY ideas that save (and make) you money.
Join our free newsletter for profitable DIY projects, clever cleaning hacks, home ideas, and creative crafts delivered straight to your inbox.
✓ Free forever • No spam • Unsubscribe anytime




