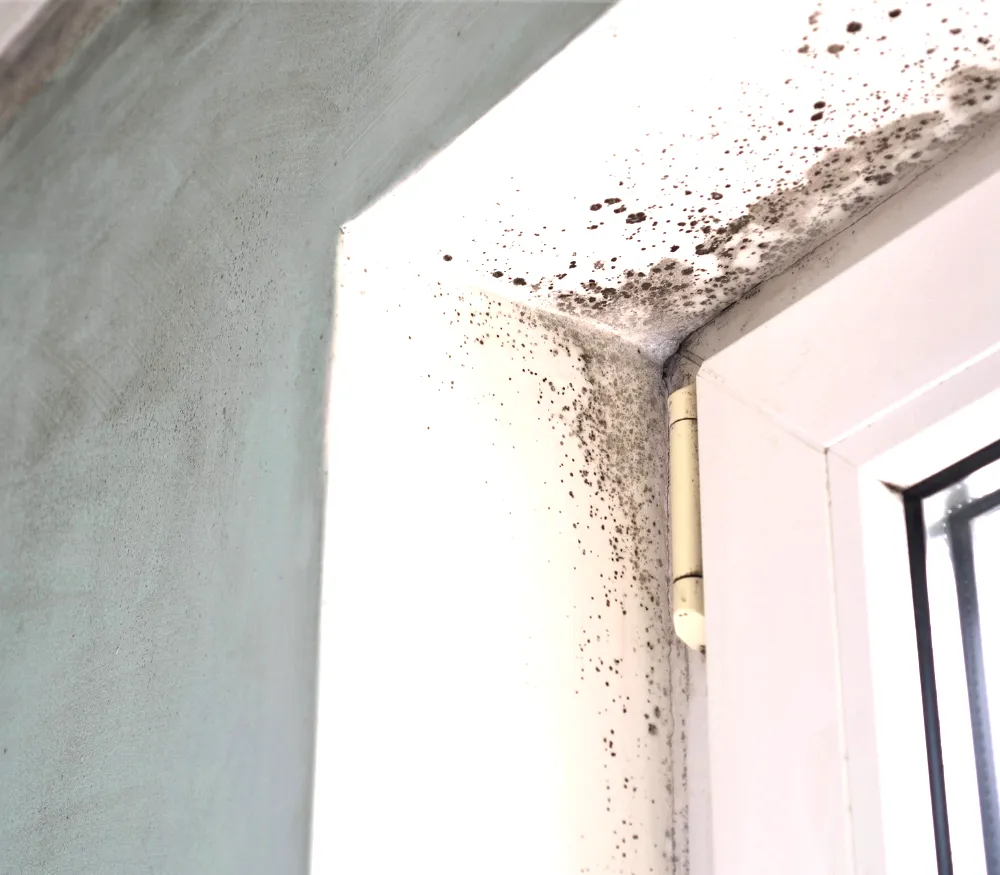
Black mold on walls is one of those problems that feels more alarming than almost anything else you can find in a home—and in some cases, that alarm is justified. But the reality is more nuanced than the headlines suggest. Not every dark patch on a wall is toxic black mold, not every mold situation requires professional remediation, and not every black mold colony is the particularly dangerous Stachybotrys chartarum that gets the most attention.
What is universally true is that mold on walls needs to be dealt with promptly and correctly—because left alone, it spreads, damages the wall structure beneath the surface, and worsens the air quality in the room. And treating it incorrectly—scrubbing without containment, using the wrong product, failing to address the moisture source—sends mold spores airborne and creates a larger problem than the original patch.
This guide covers seven methods for removing black mold from walls, from DIY solutions using household products to when and how to escalate to professional treatment. It also covers how to identify whether your mold situation is DIY-appropriate or needs professional assessment, and—most importantly—how to address the moisture source so the mold doesn’t return within weeks of cleaning.
Is It Actually Black Mold?
The term “black mold” is used loosely to describe any dark-colored mold growth on walls. True toxic black mold (Stachybotrys chartarum) is one specific species—but dozens of mold species appear black or dark grey and can grow on walls, most of which are far less toxic than Stachybotrys. Visually distinguishing between species is impossible without laboratory testing.
What this means practically: treat all dark wall mold as a potential health hazard requiring proper removal—regardless of whether it turns out to be Stachybotrys or a less dangerous species. The removal method is the same either way.
When to Call a Professional Instead of DIY
Some mold situations genuinely require professional remediation rather than DIY treatment:
- The affected area is larger than 1 square meter (roughly 10 square feet). The EPA’s guideline for DIY mold remediation is patches smaller than this. Larger areas produce more spores during disturbance and require containment equipment beyond what most homeowners have.
- The mold has penetrated into the wall cavity. If mold is visible on the surface of drywall but also soft, discolored, or deteriorating behind it, the interior of the wall is likely affected and the drywall needs to be removed and replaced—not just surface-treated.
- Anyone in the household has respiratory conditions, is immunocompromised, is pregnant, or is an infant. These groups are significantly more vulnerable to mold spore exposure during remediation.
- The mold returns rapidly after cleaning. Mold that comes back within days of treatment indicates a moisture source that hasn’t been identified or resolved—and potentially internal wall moisture that surface cleaning can’t reach.
- You can smell mold but can’t find the source. Mold smell without visible growth indicates mold behind walls, under flooring, or in the ceiling—locations that require professional investigation.
Before You Start: Safety Precautions
Regardless of which removal method you use, these safety measures apply to every situation:
- Wear an N95 respirator mask, not a basic dust mask. N95 masks filter particles small enough to include mold spores. Standard paper dust masks don’t.
- Wear rubber gloves that extend past the wrists. Mold contact with skin causes irritation and potential sensitization.
- Wear safety goggles without ventilation holes—mold spores in eyes cause irritation and potential infection.
- Seal the room as much as possible during treatment. Close all internal doors, turn off HVAC systems (which distribute spores throughout the house), and open a window in the affected room to provide ventilation outward.
- Do not use fans directed at the mold before or during treatment—this disperses spores. Ventilation should be passive (open window) rather than forced air.
- Place a plastic sheet on the floor beneath the work area to catch falling mold debris and cleaning solution.
- Bag and seal all materials used during cleaning (cloths, sponges, protective coverings) immediately after use and dispose of in outdoor bins.
What You’ll Need (Depending on the Method)
- White vinegar
- Baking soda
- Dish soap
- Hydrogen peroxide (3%)
- Bleach (chlorine bleach)
- Borax
- Commercial mold remover
- A spray bottle
- A stiff brush or old toothbrush
- Clean cloths and sponges
- Plastic sheeting
- Painter’s tape
- N95 respirator mask
- Rubber gloves
- Safety goggles
Method 1: White Vinegar (Best First-Response Treatment for Surface Mold)
White vinegar is the most widely recommended DIY mold treatment—and unlike many home remedies, there’s genuine evidence behind it. The acetic acid in white vinegar kills approximately 82% of mold species on contact, including most common household molds. It penetrates porous surfaces better than bleach, which is why it’s often more effective on painted drywall and plaster than chlorine-based products. It also doesn’t produce toxic fumes and is safe to use without specialized ventilation beyond a normal open window.
- Do not dilute the vinegar. Full-strength white vinegar (5% acidity) is the correct concentration for mold treatment. Diluting it reduces its effectiveness below the threshold needed to kill mold.
- Fill a spray bottle with undiluted white vinegar and spray the entire affected area generously, making sure the vinegar reaches all visible mold growth and extends a few centimeters beyond the visible edges—mold spreads beyond what’s visually obvious.
- Allow to sit for a minimum of one hour. This dwell time is critical—vinegar needs prolonged contact to penetrate and kill mold rather than just sitting on the surface. Don’t wipe or scrub during this time.
- After one hour, scrub the area with a stiff brush, working in small circular motions. The mold should loosen and begin lifting from the wall surface. For grout lines, tile seams, or textured surfaces, use an old toothbrush to work into the texture.
- Wipe the scrubbed area with a clean damp cloth, removing the loosened mold. Rinse the cloth in clean water before each wipe to avoid redistributing mold across the wall.
- Re-spray the area with vinegar and leave to air dry—don’t rinse the second application off. The residual vinegar continues killing mold spores that survived the scrubbing and helps prevent immediate regrowth.
- Allow to dry completely—at least several hours. Inspect in good light once dry to assess whether any mold remains. Repeat the treatment if any visible mold persists.
The vinegar smell dissipates completely as the wall dries—usually within a few hours of the final application.
Best for: Surface mold on painted walls, tiles, and plaster in areas up to 1 square meter. Not effective on porous unfinished materials like raw drywall paper, where the mold penetrates too deeply for surface treatment.
Method 2: Baking Soda and Vinegar (Best for Stubborn Surface Mold)
Used together in sequence—not simultaneously, which just neutralizes both—baking soda and vinegar provide a more thorough treatment than either alone. Vinegar kills the mold; baking soda absorbs moisture, deodorizes, and provides mild abrasion that helps lift mold from the surface. This combination is particularly effective on textured walls where mold embeds in the texture and is harder to scrub out.
- Apply the vinegar treatment first exactly as in Method 1, including the full one-hour dwell time and scrubbing step.
- After scrubbing and wiping, mix one teaspoon of baking soda with two cups of warm water in a spray bottle. Shake until fully dissolved.
- Spray the baking soda solution over the treated area and scrub again with a stiff brush. The baking soda provides additional abrasion and continues lifting any residual mold that the vinegar treatment loosened but didn’t fully remove.
- Wipe with a clean damp cloth and allow to dry.
- For persistent mold in textured surfaces, make a paste of baking soda and water (roughly 3:1 ratio) and apply it directly to the remaining mold with a brush, pressing it into the texture. Allow the paste to dry completely on the wall—the baking soda draws moisture out of the mold as it dries.
- Once the paste is fully dry, scrub with a brush and wipe clean. The dried baking soda lifts away with the loosened mold.
- Finish with a final vinegar spray and allow to air dry without rinsing.
Best for: Textured walls, stubborn surface mold that didn’t fully respond to vinegar alone, bathroom tile grout with embedded mold.
Method 3: Hydrogen Peroxide (Best for Mold on Painted Walls)
Hydrogen peroxide is an antifungal, antibacterial agent that kills mold on contact and, unlike bleach, doesn’t produce toxic fumes or significantly damage most painted surfaces. It’s the best option for painted drywall and plaster walls where bleach risks stripping paint and causing color changes, particularly on colored or dark walls.
- Use 3% hydrogen peroxide—the standard concentration available from pharmacies. Higher concentrations are more aggressive but also more likely to bleach painted surfaces.
- Test on a hidden area first. Hydrogen peroxide can lighten some paint colors—apply a small amount to a hidden section and allow to dry completely before proceeding.
- Fill a spray bottle with 3% hydrogen peroxide and spray the affected area thoroughly, saturating all visible mold and the surrounding area.
- Allow to sit for 10–15 minutes without disturbing—the bubbling reaction you may see is the peroxide reacting with organic material in the mold.
- Scrub the area with a stiff brush, working with the texture of the wall surface.
- Wipe with a clean damp cloth to remove loosened mold and peroxide residue.
- For persistent mold, apply a second treatment and allow to sit for 20–30 minutes before scrubbing again.
- Allow to dry completely and inspect in good light. Any remaining dark staining after the mold is dead may be residual discoloration in the paint or plaster rather than active mold—this can be addressed with paint rather than additional treatment.
Best for: Painted drywall and plaster walls, bathroom walls with painted surfaces, situations where bleach risk of paint damage is a concern.
Method 4: Bleach Solution (Most Powerful for Non-Porous Surfaces)
Chlorine bleach is the most powerful household mold killer available and is effective on non-porous surfaces—tiles, sealed grout, glass, and sealed painted walls. Its significant limitation is that it doesn’t penetrate porous surfaces effectively—on drywall and unfinished plaster, bleach kills mold on the surface while leaving roots (hyphae) alive deeper in the material. It also produces toxic fumes that require more careful ventilation than other methods.
- Ventilate the room thoroughly before starting—open the window fully and ensure there’s a through-draft if possible. Never use bleach in a completely enclosed space.
- Mix one cup of chlorine bleach per gallon of cold water—never hot water, which accelerates fume release. Never mix bleach with vinegar, ammonia, or any other cleaning product—these combinations produce toxic chlorine gas.
- Apply the solution to the moldy area using a sponge or cloth, working it thoroughly into all visible mold.
- Allow to sit for 10–15 minutes without scrubbing during the dwell time—the bleach needs contact time to kill the mold.
- Scrub with a stiff brush after the dwell time to remove loosened mold from the surface.
- Rinse thoroughly with clean water to remove all bleach residue—residual bleach continues to work on the surface and can cause paint and grout discoloration if left.
- Allow to dry completely with the window open.
Critical limitations:
- Do not use on drywall, unfinished plaster, or wood—bleach doesn’t penetrate these materials effectively and the water content can cause additional moisture damage and mold growth.
- Do not use on colored grout—bleach permanently discolors colored grout.
- Do not use near fabrics, carpets, or colored surfaces adjacent to the treatment area—bleach splatter causes permanent discoloration.
Best for: Bathroom tiles and sealed grout, shower enclosures, non-porous wall surfaces.
Method 5: Borax Solution (Best Long-Term Mold Prevention After Treatment)
Borax is a naturally occurring mineral compound with antifungal properties that inhibit mold growth. Unlike bleach, it doesn’t need to be rinsed off after application—the residual borax left on the surface continues to suppress mold regrowth. This makes it particularly useful as a follow-up treatment after the mold has been killed by vinegar or bleach, creating a protective layer that slows re-colonization.
- Mix one cup of borax per gallon of hot water and stir until fully dissolved. Hot water dissolves borax more effectively than cold.
- Apply the solution to the previously treated and dried area using a brush or cloth, working it thoroughly into the wall surface.
- Scrub with a stiff brush to work the borax solution into any surface texture or pores.
- Do not rinse. This is the critical difference between borax and other treatments—rinsing removes the protective residue that prevents regrowth. Wipe away excess solution with a dry cloth but leave the surface damp with borax.
- Allow to dry completely. The dried borax leaves a residue that’s invisible to the eye but inhibits mold spore germination on the surface.
- Use as a standalone treatment on mildly affected areas or as a follow-up after more aggressive treatment on heavily affected ones.
Best for: Prevention and maintenance after primary mold removal, areas prone to recurring mold such as bathroom walls and window frames, as a follow-up treatment to Methods 1–4.
Method 6: Commercial Mold Remover (Best for Persistent or Widespread Mold)
For mold that has returned after DIY treatment, covers a larger area, or is on surfaces where household products haven’t been fully effective, a dedicated commercial mold remover formulated for walls provides more consistent results than household products. Products like RMR-86, Mold Armor, Concrobium Mold Control, and similar professional-grade treatments contain fungicide formulations specifically calibrated for different surface types.
- Choose the right product for your surface type. Commercial mold removers are formulated differently for porous surfaces (drywall, plaster), semi-porous surfaces (painted walls), and non-porous surfaces (tiles). Check that the product is specified for your wall type before purchasing.
- Read and follow the product instructions exactly. Commercial mold removers vary significantly in application method, dwell time, and whether rinsing is required—don’t assume the method is the same as household cleaners.
- Apply with appropriate protection. Commercial formulations are stronger than household products and require the same or greater personal protection—N95 mask, gloves, goggles.
- Apply to a test area first if using on painted surfaces—some commercial mold removers contain bleach-based compounds that lighten paint.
- Apply the product according to instructions, ensuring full coverage of all visible mold and an adequate margin beyond.
- Allow the full specified dwell time before any scrubbing or wiping—commercial products are formulated to work within specific time windows and premature scrubbing reduces effectiveness.
- Follow up with Concrobium or a similar mold-inhibiting sealant once the surface is clean and dry, if the area is prone to recurring mold. These products form a physical barrier on the surface that mechanically crushes mold spores as they dry.
Best for: Persistent mold after DIY treatment, larger affected areas, situations where household products haven’t produced adequate results.
Method 7: Removing and Replacing Damaged Drywall (For Mold That Has Penetrated the Wall)
When mold has penetrated beyond the surface of drywall into the paper facing and gypsum core—indicated by soft, stained, or structurally compromised drywall that doesn’t respond to surface treatment—the affected drywall sections need to be cut out and replaced. Surface treatment of compromised drywall is ineffective because the mold is living throughout the material, not just on the surface.
Signs that drywall needs replacement rather than surface treatment:
- The wall surface feels soft or spongy when pressed
- The drywall paper facing is stained dark beyond the surface
- Surface treatment has been applied multiple times without lasting results
- There’s visible mold on the surface and a musty smell persists after cleaning
- The drywall is discolored in a pattern that suggests water damage from behind
The removal process:
- Contain the work area before cutting. Seal doorways with plastic sheeting and tape—cutting into mold-infested drywall releases significantly more spores than surface cleaning. Full N95 respirator and goggles are essential.
- Cut a section larger than the visible mold damage. Use a drywall saw or oscillating tool to cut at least 30cm beyond all visible mold in each direction. Mold within drywall spreads beyond visible boundaries—cutting just to the edge of visible damage leaves affected material in the wall.
- Inspect the wall cavity once the drywall is removed. If mold is present on the studs, insulation, or other framing within the wall cavity, address it before installing new drywall:
- Studs with surface mold: Sand and treat with a commercial mold remover or borax solution, allow to dry completely.
- Insulation with mold: Remove and replace—insulation cannot be effectively cleaned of mold.
- Widespread cavity mold: This level of contamination requires professional assessment.
- Address the moisture source before installing new drywall—this is the most critical step. New drywall installed without resolving the underlying moisture issue will develop mold again within months.
- Install mold-resistant drywall (also called greenboard or purple board) as the replacement. Mold-resistant drywall has a fiberglass facing rather than paper, which provides significantly less food source for mold than standard paper-faced drywall.
- Apply mold-resistant primer before painting the new and adjacent drywall sections.
Best for: Drywall with mold that has penetrated beyond the surface, recurring mold in the same location despite surface treatment, soft or structurally compromised wall sections.
Method Comparison at a Glance
| Method | Best Surface | Kills Mold | Prevents Regrowth | DIY-Friendly |
|---|---|---|---|---|
| White vinegar | Painted walls, plaster | Yes | Partially | Yes |
| Baking soda + vinegar | Textured walls, grout | Yes | Partially | Yes |
| Hydrogen peroxide | Painted drywall | Yes | No | Yes |
| Bleach solution | Tiles, non-porous surfaces | Yes | No | Yes (with ventilation) |
| Borax solution | All surfaces | Yes | Yes | Yes |
| Commercial remover | All surfaces | Yes | Yes (some products) | Yes |
| Drywall replacement | Compromised drywall | Complete | Yes (with mold-resistant board) | Moderate |
What’s Actually Causing the Mold (And How to Fix It)
Cleaning mold without fixing the moisture source is the single most common reason mold returns within weeks of treatment. Mold requires moisture to grow—remove the moisture and mold cannot establish itself regardless of how many spores are present. Every mold situation has a specific moisture cause, and identifying it is as important as the cleaning itself.
Condensation on cold walls: The most common cause of mold on internal walls—warm, humid room air hits a cold wall surface and condenses, providing the moisture mold needs. Most common on north-facing walls, exterior walls with poor insulation, and walls adjacent to cold rooms.
Fix: Improve wall insulation, increase room temperature slightly, improve ventilation to reduce indoor humidity. A dehumidifier significantly reduces condensation in chronically humid rooms.
Bathroom and kitchen humidity: Steam from showers, baths, and cooking dramatically increases room humidity. Without adequate extraction, this humidity settles on walls and feeds mold.
Fix: Ensure extraction fans are functioning and actually venting to outside (not just recirculating), run them during and for 15–20 minutes after showering or cooking, open windows after bathing.
Plumbing leaks: A slow leak behind a wall produces a concentrated moisture source that creates persistent, recurring mold in a specific location.
Fix: Identify and repair the leak before any mold treatment—new drywall over an unresolved leak will be compromised again within months.
Rising damp: Moisture rising from the ground through walls, common in older homes without adequate damp-proof courses. Produces mold that starts at the base of walls and rises.
Fix: This requires professional assessment and damp-proofing treatment—it’s not solvable with cleaning alone.
Roof leaks: Water ingress from above tracking down walls. Often produces mold at ceiling-wall junctions or in upper sections of walls.
Fix: Identify and repair the roof issue before addressing the wall mold.
How to Prevent Black Mold from Returning
Once mold has been removed and the moisture source addressed, a few consistent habits keep it from re-establishing:
- Maintain indoor humidity between 30–50%. A hygrometer (inexpensive, widely available) lets you monitor actual humidity rather than guessing. Above 60% humidity, mold growth accelerates significantly.
- Ventilate bathrooms and kitchens properly. These are the highest-humidity rooms in most homes. Functional extraction fans venting to outside are the most important single prevention measure.
- Leave a gap between furniture and exterior walls. Furniture pushed against cold external walls blocks airflow and creates a stagnant, humid microclimate that develops mold rapidly.
- Wipe condensation from windows and cold walls on cold mornings—standing condensation on walls provides exactly the moisture mold needs.
- Apply mold-resistant paint when repainting rooms that have had mold issues. These paints contain fungicide additives that significantly slow mold establishment on the surface.
- Address small patches immediately. A patch of mold the size of a coin treated promptly with vinegar takes five minutes. The same patch left for a month requires a full remediation session.
FAQ
Is black mold on walls dangerous? All household molds should be treated as potential health hazards—they can cause respiratory irritation, allergic reactions, and in sensitive individuals, more serious symptoms regardless of species. Stachybotrys chartarum (true toxic black mold) is significantly more dangerous and requires professional remediation. Since visual identification is impossible, take all wall mold seriously and use appropriate protection during removal.
Can I paint over black mold instead of removing it? No. Paint applied over mold traps moisture and creates ideal conditions for mold to continue growing beneath the surface. The mold breaks through the paint within weeks to months, often in a larger area than the original patch. Mold must be killed and removed before any painting.
How do I know if the mold is completely gone? The treated area should show no visible dark patches and should smell clean rather than musty once dry. Inspect in good light—raking light from a lamp at a low angle reveals surface irregularities better than overhead lighting. If any patches remain, repeat treatment. Persistent patches after two full treatments likely indicate penetration into the wall material.
Can black mold grow back after cleaning? Yes—if the moisture source hasn’t been resolved, mold will regrow regardless of how thoroughly the surface was cleaned. Mold spores are present in all indoor environments and will colonize any surface that provides moisture and organic material. Fixing the moisture source is the only permanent solution.
How long does it take for mold to grow back if untreated? In a continuously humid environment—a bathroom without adequate ventilation, a wall with an ongoing condensation problem—mold can re-establish visible growth within two to four weeks. In a properly dried and ventilated environment after full treatment, mold may not return at all if the moisture source has been resolved.
The Bottom Line
Removing black mold from walls is a two-part problem: killing and removing the existing mold, and fixing the moisture source that allowed it to grow. Get the first part right and ignore the second, and the mold comes back. For surface mold on sealed or painted walls up to 1 square meter, white vinegar applied full-strength with a one-hour dwell time is the most effective starting point. Follow with a borax treatment to inhibit regrowth. Use bleach only on non-porous surfaces like tile where penetration isn’t needed. And for any mold that has compromised the wall structure, that covers a large area, or that returns quickly after treatment, professional assessment is the right call—not because the mold is necessarily toxic, but because it indicates a moisture problem that surface cleaning alone will never resolve.
Enjoyed this project? Get even more DIY ideas that save (and make) you money.
Join our free newsletter for profitable DIY projects, clever cleaning hacks, home ideas, and creative crafts delivered straight to your inbox.
✓ Free forever • No spam • Unsubscribe anytime