
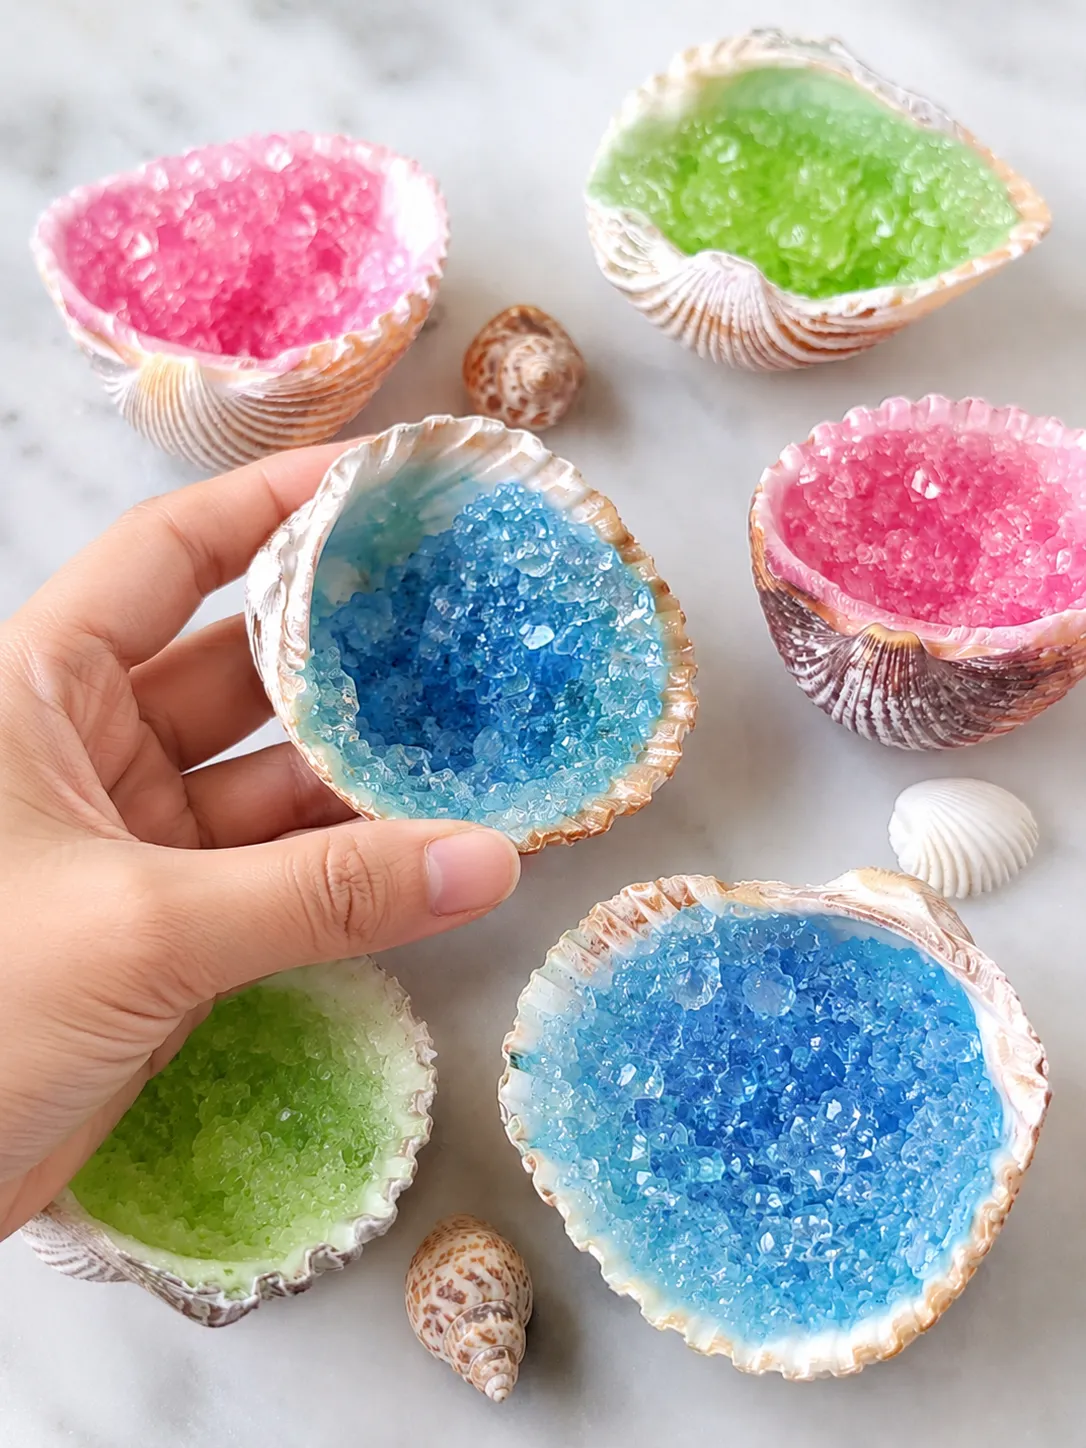
There’s a moment about 12 hours into this experiment where you lift the shells out of the borax solution and the light hits the crystal formations at just the right angle, and what you see looks almost too beautiful to have come from a jar on your kitchen counter. Feathery white crystal clusters covering every curve and ridge of the shell, catching and scattering light like frost on a winter morning. That moment is genuinely satisfying for kids and adults alike, which is part of why this experiment gets requested again and again once a household has tried it.
DIY borax crystal seashells sit in that rare sweet spot between science experiment and art project. The process is real chemistry, the same crystal-growing principles behind cave formations and mineral deposits happening at kitchen speed with a box of borax from the laundry aisle. The result is something beautiful enough to display on a shelf or give as a gift, which gives the experiment a payoff that goes well beyond just the learning that happens while you’re watching the crystals form.
Here’s exactly how to do it, what’s actually happening chemically, and the specific steps that make the difference between sparse, disappointing results and the kind of dramatic, fully-crystallized shells that make people stop and ask how you made them.
The Science Behind Borax Crystal Seashells
Understanding what’s actually happening during this experiment helps both with getting better results and with turning it into a genuinely educational experience for kids rather than just a cool visual.
Borax crystal growing works on the principle of supersaturation. When you dissolve borax powder in hot water, the heat allows the water to hold far more dissolved borax than it could at room temperature. As the solution slowly cools and water gradually evaporates, the water can no longer hold all that dissolved borax in liquid form, and the excess comes out of solution as solid crystals, attaching to any available surface and building up layer by layer over time.
The seashell provides what scientists call a nucleation site, a surface with tiny irregularities that give the first crystals something to grab onto and begin forming. More crystal then builds on top of those initial formations, layer by layer, until the whole shell is covered in the branching, feathery clusters that make borax crystal seashells so visually striking.
Borax crystals grow in irregular, branching formations rather than the precise geometric shapes of some other minerals, which gives them that frost-like, organic quality that looks so different from the clean angular crystals produced by alum or salt. The crystal shape is determined by the molecular structure of borax itself and the way its atoms pack together during crystallization, which is why every borax crystal experiment produces that same distinctive feathery look.
A shell that’s been prepared with a thin seed crystal layer before submerging grows crystals faster and more evenly than an untreated smooth shell, because the rough, mineral-coated surface provides far more nucleation sites for crystals to begin forming on.
What You’ll Need
- Clean dry seashells in various sizes (larger shells show off the crystals more dramatically, though smaller ones work perfectly well)
- Borax powder (found in the laundry aisle of most grocery stores, commonly sold under the brand name 20 Mule Team Borax)
- Boiling water
- A glass jar or heatproof container large enough to fully submerge the shells
- String or pipe cleaners to suspend the shells in the solution
- A pencil or skewer to rest across the top of the jar
- Food coloring (optional, for tinted crystal effects)
- A paintbrush for the seed crystal preparation step
- Rubber gloves
- Paper towels for drying
Why Borax Works So Well for This Experiment
Borax is one of the most beginner-friendly crystal-growing materials available for a few specific reasons that make it worth choosing over alternatives like alum or salt for a first attempt.
It grows results noticeably faster than most alternatives, with visible crystal formations often appearing within just a few hours and dramatic coverage developing within 12 to 24 hours. That shorter timeline keeps kids engaged through the experiment rather than losing interest during a multi-day wait.
The crystal formations it produces are also particularly striking on organic shapes like seashells, since the branching, irregular nature of borax crystals follows the contours and ridges of the shell beautifully rather than forming in a uniform layer that obscures the shell’s shape.
Borax is also widely available and inexpensive, making this experiment easy to repeat and experiment with rather than being a one-time activity limited by access to specialty materials.
Preparing the Shells (Don’t Skip This Step)
This preparation phase is the most commonly skipped part of the process and also the one that makes the biggest difference to the final result. Shells that are properly prepared consistently produce more even, more dramatic crystal coverage than shells dropped straight into the solution without any prep.
Wash the shells thoroughly in warm soapy water to remove any oil, sunscreen residue, sand, or organic material from the surface, since any coating on the shell interferes with the crystals’ ability to adhere once they start forming. Rinse completely and allow to dry fully before moving on.
Lightly sand the exterior surface of each shell with fine-grit sandpaper, enough to create a slightly rough texture without removing the shell’s natural color or markings. This roughened surface dramatically increases the number of nucleation sites available and gives crystals far more to grab onto during the growth phase.
Make a small amount of the borax solution ahead of time following the instructions in the next section, then paint a thin layer of it directly onto the shell surface using a paintbrush. Allow this painted-on layer to dry completely before using the shell in the main experiment. As it dries, it leaves a thin residue of borax seed crystals on the surface, which serve as starting points for the crystal growth in the full solution and result in noticeably more even coverage across the whole shell.
Tie a piece of string around the shell or wrap a pipe cleaner through a hole or around a ridge in the shell, giving it a way to be suspended in the solution rather than resting on the bottom of the jar. A shell sitting on the bottom of the container will have a flat, crystal-free patch wherever it contacts the glass, while a suspended shell grows crystals evenly on all surfaces including the underside.
How to Make the Borax Solution
Bring two cups of water to a rolling boil in a small saucepan. Boiling temperature is important here rather than just hot water from the tap, since the goal is to dissolve as much borax as the water can possibly hold, which requires the highest achievable temperature to maximize the concentration.
Add borax powder three tablespoons at a time, stirring after each addition until completely dissolved before adding the next spoonful. Continue adding borax until it no longer dissolves and a small amount remains sitting on the bottom of the pot even after thorough stirring. This is the point of full saturation, meaning the water is holding as much dissolved borax as it possibly can at that temperature.
If you want colored crystals, add a few drops of food coloring now while the solution is still hot and stir to distribute evenly. Keep in mind that borax crystals are naturally white and somewhat opaque, so the food coloring tints the crystals rather than making them fully saturated in color, and the final result tends to be softer and more pastel in tone than the deeply colored solution might suggest. Blue and purple tend to show up most vividly, while yellow and red result in more subtle tints.
Carefully pour the hot solution into your glass jar, using a heat-resistant pitcher or ladle to transfer it safely without splashing. Allow the solution to cool for about 10 minutes before adding the shells, since placing shells into boiling solution can cause thermal shock cracking in thinner shells.
Setting Up and Growing the Crystals
Lower the prepared shell into the cooled solution on its string, with the string tied to the pencil or skewer resting across the top of the jar so the shell hangs freely and is fully submerged without touching the sides or bottom of the container.
If you’re doing multiple shells at once, space them far enough apart that they won’t touch each other as crystals form, since shells that contact each other during growth can fuse together and both become difficult to remove cleanly.
Cover the jar loosely with a paper towel secured with a rubber band. This keeps dust and debris out of the solution while still allowing adequate air circulation for evaporation to occur, which is one of the key drivers of crystal growth. A tight lid traps humidity and significantly slows the process.
Place the jar somewhere it absolutely won’t be moved or bumped for the full growth period. Vibration and physical disturbance during crystal formation disrupts the growing process and results in smaller, less organized crystal formations. A shelf, the back of a kitchen counter, or a stable windowsill away from foot traffic all work well.
Avoid placing the jar anywhere with temperature fluctuations during the growth period. Near an air conditioning or heating vent, in direct sun that comes and goes through the day, or anywhere with noticeable drafts, all cause temperature inconsistency that results in smaller, less dramatic crystals than a stable cool environment produces.
Check on the shells after about 8 to 12 hours. Visible crystal formations should already be appearing on the shell surface. By 24 hours the coverage should be quite dramatic. For the most fully developed results, leave the shells undisturbed for the full 24 to 48 hours before removing.
Lift the shells gently out of the solution using the string and place them on a paper towel to drain, without touching the crystal surfaces directly, since wet crystals are significantly more fragile than fully dried ones and can chip or break off under even light pressure.
Variations Worth Trying
Colored borax crystal seashells are the most popular variation and produce results that range from softly pastel to more vividly tinted depending on how much food coloring is added to the solution. Making several jars simultaneously with different colors and giving each shell a different tint creates a set that looks especially striking displayed together.
Layered crystal shells involve growing one layer of crystals, removing the shell and allowing it to dry completely, then submerging it again in a differently colored solution to grow a second layer on top of the first. The result has visible layers of different tinted crystals that adds depth and complexity to the final piece.
Glow-in-the-dark crystal shells use tonic water (which contains quinine and glows under UV light) as the base for dissolving the borax, following the same method otherwise. Under normal light the shells look identical to regular borax crystal shells, but under a blacklight they glow blue-white, which is always a dramatic reveal.
Comparing crystal materials uses three identical shells to grow borax, alum, and Epsom salt crystals simultaneously in separate jars, then displays all three side by side for a clear visual comparison of how different minerals grow in different structures. This turns a single craft into a genuine comparative science experiment.
Miniature crystal garden places several shells of different sizes in a wider, shallower container rather than individual jars, all suspended at different depths so they’re visible through the glass as crystals grow simultaneously, creating a miniature crystal landscape rather than individual pieces.
Quick Fixes for Common Problems
| Problem | Potential Solution | Alternative Approach |
|---|---|---|
| Very few crystals forming after 12 hours | The solution likely wasn’t concentrated enough—remake it with more borax added at boiling temperature until no more will dissolve | The shell surface may be too smooth—remove it, sand more thoroughly, paint on a seed layer, allow to dry, then resubmerge |
| Crystal coverage is uneven with bare patches | The shell is touching the jar wall in those spots—reposition it to hang completely free of all surfaces | Rotate the shell very gently after the first two hours before crystals have firmly attached to expose different surfaces |
| Crystals growing in the jar itself but not on the shell | The shell wasn’t seeded before submerging—the jar glass has more surface irregularities than the smooth shell | Remove the shell, coat it in the solution with a brush, let it dry to create seed crystals, and resubmerge |
| Crystals are very small and fine rather than dramatic | Temperature fluctuations during growth—move to a more stable location and try again | The solution cooled too quickly—insulate the jar by wrapping it loosely in a towel during the first few hours |
| Crystals fell off when the shell was removed | Borax crystals are more delicate than some other crystal types—lift gently using the string only and don’t touch directly until fully dry | Allow to drain on a paper towel for at least two hours before any handling |
| Solution looks cloudy rather than clear | This is normal as the solution cools and some borax precipitates out—it still grows crystals effectively and doesn’t need to be fixed | Strain through a coffee filter before pouring into the jar if you want a clearer solution |
How to Display and Preserve Borax Crystal Seashells
Borax crystal seashells are more fragile than the plain shells they started as, since the crystal formations can chip or break off if handled roughly or knocked against hard surfaces. A few simple steps help preserve them for display.
Allow the shell to dry on a paper towel for at least two hours before touching any of the crystal surfaces directly. Fully dried crystals hold significantly better than ones handled while still damp from the solution.
Display them somewhere they can be admired visually without being handled frequently. A shadow box frame, a small glass display dome, or a shelf positioned out of reach of young children all work well for longer-term display.
For shells you want to preserve indefinitely, a very light application of clear acrylic spray sealer applied from about 12 inches away helps protect the crystal surface from chipping and from humidity-related dissolution over time, without significantly changing the appearance or the way the crystals catch light.
Keep crystal seashells away from high-humidity environments like bathrooms, since sustained high humidity can cause borax crystals to slowly dissolve back into the absorbed moisture over time, gradually reducing the crystal coverage.
Turning This Into a Proper Science Experiment
For older kids or anyone wanting to take this beyond a craft activity and into genuine scientific method territory, borax crystal seashells offer a lot of scope for structured experimentation.
Test whether temperature of the growth environment affects crystal size by setting up two identical jars of solution with identical shells, placing one in a warmer spot and one in a cooler spot, and comparing the crystal size and coverage after the same amount of time.
Test whether solution concentration affects growth speed by making one jar at full saturation and one at half saturation and timing how long visible crystals take to appear on each shell.
Test whether the seed crystal preparation step makes a significant difference by seeding one shell thoroughly and leaving another completely untreated but otherwise identical, placing both in the same jar and comparing coverage after 24 hours.
For each variable tested, help kids write a prediction before starting, record observations at regular intervals, and write a conclusion once the shells are removed. This structure transforms an already engaging craft into a properly conducted science experiment with real controlled variables and observable results.
FAQ
Is borax safe to use with children?
Borax is a naturally occurring mineral compound that’s been used in households for decades. It should be treated with reasonable caution during the preparation step specifically because the hot solution poses a burn risk, and borax powder shouldn’t be inhaled. Adult involvement is essential for the boiling and pouring stages. The dried crystals on the finished shells are stable and safe to handle normally, though they shouldn’t be put in the mouth.
How long do borax crystal seashells last once they’re removed from the solution?
Stored in a dry, low-humidity environment, borax crystal seashells can last indefinitely. High humidity is their main enemy, since borax is hygroscopic and can slowly absorb moisture from the air, which in very humid conditions can gradually dissolve the crystal surface over time. A sealed display case or a light coat of acrylic sealer prevents this.
Can I reuse the borax solution for multiple batches?
Yes. Reheat the solution to dissolve any crystals that formed in the jar, bring back to boiling, add more borax until saturation is reached again, and use for another set of shells. The solution can be reused multiple times before it becomes too depleted to grow good crystals.
What’s the best shell type for this experiment?
Larger shells with pronounced ridges, textures, or irregular surfaces generally grow the most visually impressive crystal formations, since the crystals follow the contours of the shell and those contours give the finished piece more visual depth. Flat, smooth shells grow crystals just as well chemically but tend to look less dramatic as a finished piece. Scallop shells, oyster shells, and conch shells are particularly good choices.
Why did my crystals turn out white even though I added blue food coloring?
Borax crystals are naturally white and semi-opaque, which means color tinting is always softer than the color of the solution itself. Adding more food coloring than the recipe suggests helps, but the tinted result will always be more pastel in tone than a fully pigmented solid color. Blue and purple food coloring tend to show up most visibly in the finished crystals compared to warmer colors.
Conclusion
DIY borax crystal seashells deliver one of the best results-to-effort ratios of any science experiment that can be done at home, producing something genuinely beautiful within 24 hours from a box of laundry aisle borax and shells collected from a beach or craft store. Prepare the shells properly with the seed crystal step, make sure the solution is fully saturated at boiling temperature, find somewhere stable and undisturbed for the growth period, and let the chemistry do the rest. The feathery white formations that develop overnight look like nothing else in a home craft project, and they hold up beautifully on a display shelf as a reminder that some of the most visually striking things in the world are produced by very simple science.
Enjoyed this project? Get even more DIY ideas that save (and make) you money.
Join our free newsletter for profitable DIY projects, clever cleaning hacks, home ideas, and creative crafts delivered straight to your inbox.
✓ Free forever • No spam • Unsubscribe anytime




