
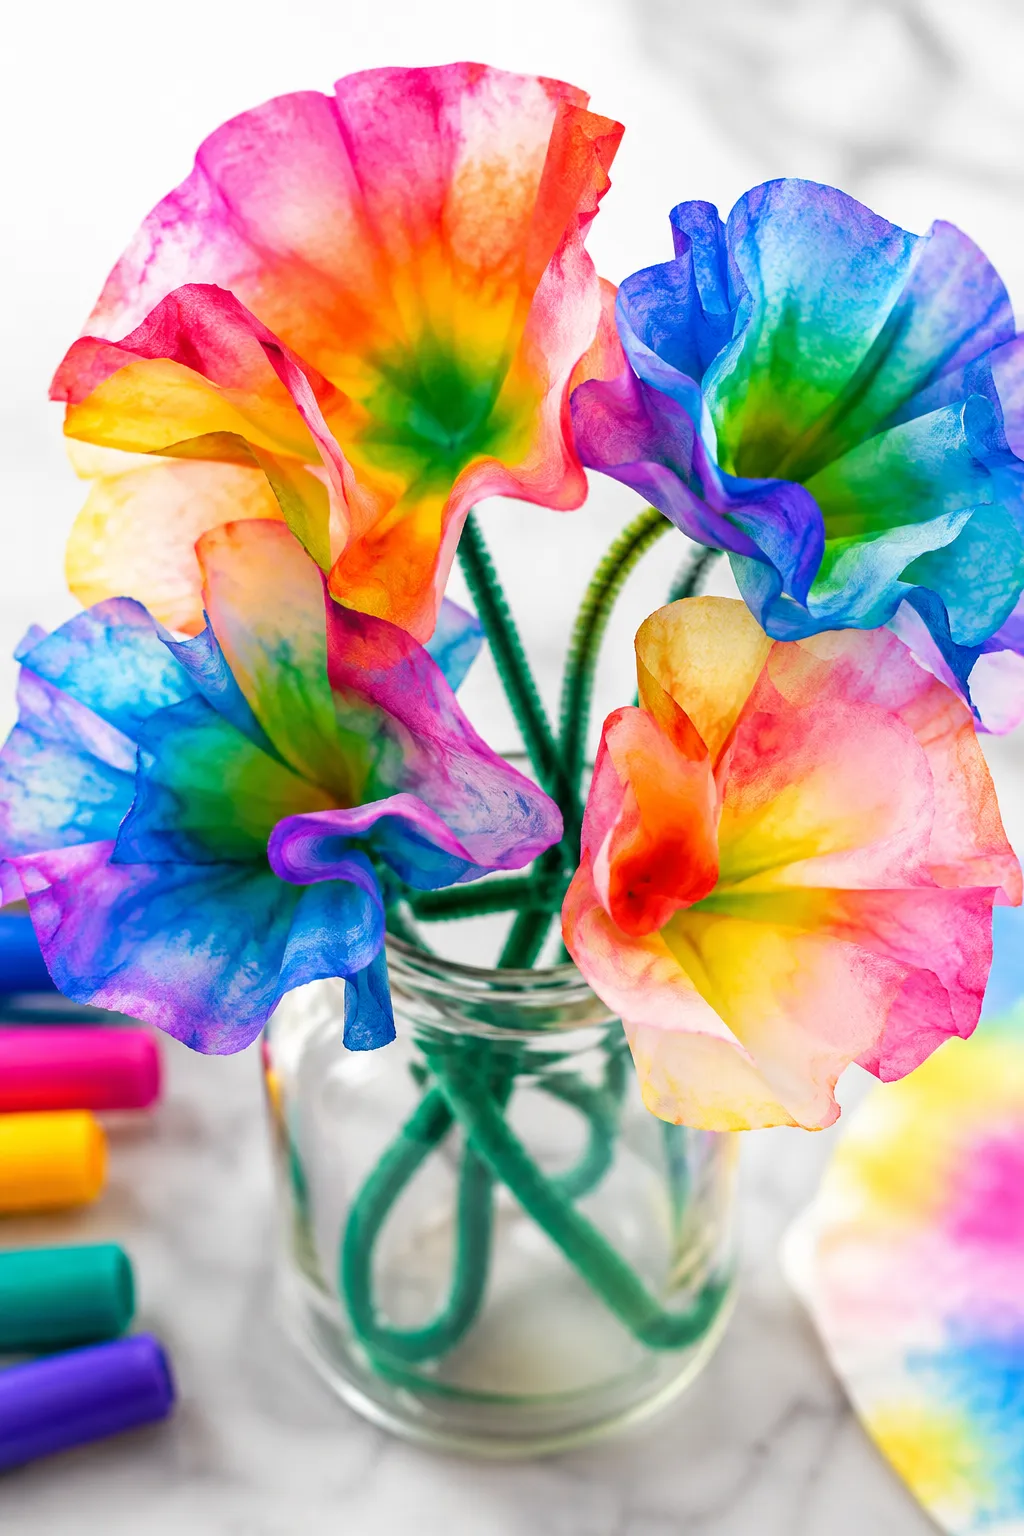
There’s something almost hypnotic about watching color travel through a coffee filter on its own. You set it up, you add the water, and then the colors just start moving, slowly spreading and blending along the fibers of the filter in a way that looks deliberate and artistic even though no brush or hand is guiding it. Kids who watch this for the first time tend to go very quiet for a moment before erupting into questions about why it’s happening, which is exactly the kind of reaction a great science activity produces.
Rainbow walking coffee filter flowers combine two things that are independently satisfying, making flowers from coffee filters and watching color spread through water, into one activity that delivers on both the craft and the science side simultaneously. The finished flowers are genuinely beautiful, with soft watercolor-like color gradients that look like they took real artistic skill to produce. The science behind it is real and interesting enough to spark a genuine conversation about how water moves through materials.
The whole thing uses supplies most households already have, takes about 20 minutes of active time, and produces results that are worth keeping, displaying, or turning into cards and gifts.
The Science: What Is Capillary Action?
The color-spreading phenomenon that makes this experiment work is called capillary action, and it’s worth explaining before diving into the steps because it transforms this from a pretty craft into a genuine science lesson that kids actually remember.
Capillary action is the ability of water to move through narrow spaces against the force of gravity, without any external force pushing it. It happens because of two properties of water working together. The first is adhesion, which is water’s tendency to stick to other surfaces. The second is cohesion, which is water molecules’ tendency to stick to each other. When water molecules at the leading edge of a wet surface adhere to the dry material ahead of them, the cohesive pull of all the water molecules behind them follows, drawing the whole body of water forward through the material.
Coffee filters are made from tightly compressed cellulose fibers with tiny channels between them that water can travel through via capillary action. When you dip the tip of a decorated coffee filter into water, the water starts climbing upward through those fiber channels on its own. As it travels, it carries the soluble pigments from the markers with it, spreading and blending them along the path of the water’s movement through the filter.
This same process is responsible for how trees pull water from their roots up to their leaves, how a paper towel absorbs a spill across its surface, and how wicks in candles and oil lamps carry fuel upward toward the flame. By watching it happen in real time in a coffee filter, kids are observing a fundamental physical principle that operates throughout the natural world.
What You’ll Need
- Round coffee filters, basket-style ones work best since they’re flat and circular when opened out
- Washable markers in multiple colors, the more colors the more dramatic the result
- A cup or jar of water
- Scissors
- Green pipe cleaners or green paper straws for stems
- A stapler or tape
- Paper towels for drying
- A waterproof mat or newspaper to work on, since wet filters bleed color onto surfaces underneath
Optional extras:
- A spray bottle for an alternative wetting method
- Green construction paper for leaves
- A vase or display jar for the finished flowers
How to Make Rainbow Walking Coffee Filter Flowers
Open out a basket coffee filter into its full circular shape and lay it flat on a protected surface. The white surface of the filter is your canvas for the marker step, and having it fully flattened before decorating makes the coloring easier and produces more even results.
Color the coffee filter with washable markers, working outward from the center in rings or sections of different colors. There’s no single right way to do this step, but a few patterns that consistently produce the most dramatic rainbow effect include concentric rings of different colors from center to edge, a sunburst pattern radiating outward from the center, and a pie-slice division of the filter into sections of different colors. Avoid leaving large areas of white uncolored, since those sections will stay white rather than picking up color from nearby sections during the water step.
Use washable markers specifically rather than permanent markers, since permanent markers don’t dissolve in water and the color won’t travel with the capillary action. The washable ink is water-soluble, which is exactly what allows it to be carried along with the water as it moves through the filter.
Press firmly with the markers to get vivid, saturated color rather than a light pass across the surface, since more ink in the filter means more pigment available to spread and blend when the water starts moving.
Once the filter is decorated to your satisfaction, pinch the center of the flat circle and lift it, allowing the filter to form a natural ruffled cone shape with the center point at the bottom. This is the basic flower shape.
Dip just the very tip of the pinched center point into a cup of water and hold it there, watching from the side or top as the water starts climbing upward through the filter from the dip point. The colors will begin moving and blending almost immediately.
Keep the tip in the water until the color has spread as far as you want it to, typically until it reaches at least halfway or two-thirds of the way up the filter petals. The longer you leave it, the further the water travels and the more the colors blend with each other where they meet.
Remove the filter from the water and open it gently, laying it flat on a paper towel to dry. The colors will look even more vivid and blended once fully dry than they do while still wet, so don’t judge the final result until drying is complete.
Once the filter is fully dry, pinch the center again and twist the base of the gathered filter to form the flower shape, securing it with a twist of green pipe cleaner or by taping it to a paper straw for a stem.
Fluff the petals gently outward to open the flower and adjust the shape so it looks full and blooming rather than flat and compressed.
Different Decorating Patterns and What They Produce
The way you color the filter before adding water significantly changes what the finished flower looks like, and experimenting with different patterns is part of the fun of this activity.
Rainbow rings, concentric circles of red, orange, yellow, green, blue, and purple from center to edge, produce a classic rainbow effect where each color band stays mostly distinct while blending softly at the edges where colors meet.
Spiral patterns created by drawing a spiral from the center outward in a single color, then filling in between spiral lines with different colors, produce a swirling, kaleidoscopic effect in the finished flower as the capillary action draws each color upward from the spiral lines.
Random dot patterns, pressing the marker tip repeatedly to make dots across the whole filter in multiple colors rather than drawing lines or sections, produce a more surprising result since dots of nearby colors spread and meet each other in unpredictable ways.
Two-color simple patterns using just two contrasting colors like blue and yellow, or red and blue, allow kids to observe the color-mixing that happens where the two spreading colors meet, which is a great teaching moment about primary and secondary colors.
Gradient fading, coloring heavily at the center with a dark color and gradually making marks lighter and further apart toward the edge, produces flowers with a rich center that fades to softer color at the petal tips.
Making a Full Coffee Filter Flower Bouquet
A single coffee filter flower is pretty. A dozen arranged together in a vase is stunning, and the cumulative effect of multiple flowers with slightly different color patterns displayed together is one of those results that looks far more impressive than the effort involved.
Make flowers in different color combinations and patterns rather than identical ones, since variation makes the bouquet look more like a real mixed flower arrangement rather than a uniform set.
Vary the size by using different sizes of coffee filter if available, or by gathering more or less of the filter base before attaching the stem, since more gathered base creates a rounder, more compact flower head while less gathered base produces a wider, more open bloom shape.
Add leaves by cutting leaf shapes from green construction paper and threading them onto the pipe cleaner stems before attaching the flower head, which makes each flower look more complete and botanical.
Display in a small glass vase or jar, cutting the stems to slightly different lengths so the flowers sit at different heights within the arrangement for a more natural, gathered bouquet effect.
Variations That Change the Experience
Spray bottle method instead of dipping produces a different color spreading effect by misting the decorated flat filter with water from above rather than dipping the tip in water from below. The color spreads outward from wherever the water droplets land rather than traveling upward from a single point, which creates a more random, watercolor wash effect than the upward-traveling dip method.
Painting with water uses a paintbrush dipped in water to draw lines and shapes onto the decorated filter, watching the color spread and bleed along the brushstroke rather than moving through the whole filter at once. This gives kids much more control over where the color travels and produces a more intentional, painterly result.
Coffee filter suncatchers take the decorated, water-spread filters and mount them in a window using contact paper or laminate rather than forming them into flowers, since the translucent quality of the colored filters lets light shine through beautifully, similar to a stained glass effect.
Layered flowers place two differently colored and patterned filters on top of each other before pinching into the flower shape, so the finished flower has two layers of petals with different color patterns visible from different angles.
Butterfly version folds the flat circular filter in half and then in half again before decorating, so when opened after the water step each quarter of the circle has a symmetrical color pattern creating a four-wing butterfly shape rather than a flower.
Turning This Into a Science Lesson
The coffee filter flower activity is genuinely fun as a pure craft, but a few simple additions turn it into a more deliberate science learning experience for kids who are ready to engage with it that way.
Before adding water, ask kids to predict where the colors will go once the water starts traveling through the filter. Write down or draw the prediction, then compare it to what actually happens. Predicting and observing is the foundation of scientific thinking, and this activity gives clear, visual feedback within minutes.
Try the same colored filter with different liquids instead of plain water, such as a small amount of vinegar or salt water, and compare whether the color travels the same way. Different liquids have different surface tension and adhesion properties that affect capillary action in measurable ways.
Test whether different paper types behave differently by decorating a regular paper towel, a tissue, a piece of newspaper, and a coffee filter in identical patterns and comparing how far and how fast color travels through each material with the same amount of water.
Introduce the vocabulary of capillary action, adhesion, cohesion, and absorption during the activity rather than before or after, since kids remember words they encountered during an active, engaging experience far better than ones introduced in isolation.
Quick Fixes for Common Problems
| Problem | Potential Solution | Alternative Approach |
|---|---|---|
| Colors aren’t spreading very far up the filter | Make sure washable rather than permanent markers were used, since permanent marker won’t travel with water | Dip slightly further up the filter rather than just the very tip, giving the water a head start |
| Colors all blended into a muddy brown | Colors directly opposite each other on the color wheel, like red and green, mix into brown—try analogous colors that sit next to each other on the wheel instead | Use fewer colors with more space between each one so they don’t fully mix before producing the blended zone |
| Filter is tearing when wet | Coffee filters are delicate when fully saturated—handle them gently and let them dry flat rather than picking them up while still very wet | Let the filter drain on a paper towel for a few minutes before attempting to move it |
| Flower won’t hold its shape after drying | Gather the base more tightly before securing with the pipe cleaner stem | Use a small piece of tape wrapped around the base of the gathered filter before adding the pipe cleaner |
| Colors look faded and pale in the finished flower | More marker coverage needed at the decorating stage—press firmly and apply multiple layers of color | Use a finer-tip marker with more concentrated ink for more vivid color transfer |
| Filter dried flat instead of in flower shape | Form into the flower shape while still slightly damp rather than waiting until fully dry | Reshape gently once fully dry by moistening the base slightly and re-gathering before the pipe cleaner stem sets |
What Ages Is This Best For?
The coffee filter flower activity works across a surprisingly wide age range, with the experience looking quite different at each end of the spectrum.
For toddlers and young preschoolers, the coloring phase is the main event. Big chunky markers, lots of color freedom, and the watching-the-colors-move phase are all completely accessible and genuinely exciting at this age. The assembly into an actual flower shape might need adult help, but the core sensory and visual experience is fully engaging.
For preschool and kindergarten ages, this hits a sweet spot. Kids this age are old enough to make deliberate color choices, follow the pattern ideas, and engage with simple questions about why the colors are moving, while still being young enough that the magic of watching it happen produces genuine delight.
For early elementary ages, the science framing becomes more interesting and accessible. Introducing the term capillary action, making predictions before adding water, and trying the variations and comparisons described in the science lesson section above all add layers of engagement for kids who are ready for a more structured exploration.
For older kids and even adults, this works well as a meditative, satisfying craft activity where the focus is on the aesthetic result rather than the science, particularly when making a full bouquet or using more complex color patterns.
FAQ
Why do washable markers work for this but permanent markers don’t?
The difference comes down to how the ink is formulated. Washable marker ink is water-soluble, meaning the ink molecules dissolve in water and can then be carried along with it as the water moves through the filter via capillary action. Permanent marker ink is specifically designed to resist water, which is why it stays put when wet rather than traveling through the filter with the water.
Can I use watercolor paints instead of markers?
Yes, watercolor paints work beautifully and produce even more vibrant color since you can mix custom colors rather than being limited to the markers you have available. Apply the watercolor paint directly to the dry filter with a brush and allow it to dry completely before doing the water step, since applying water immediately after painting just dilutes the fresh paint rather than creating the capillary spread effect.
How long do the finished flowers last?
Coffee filter flowers last indefinitely since the dried filter paper is quite stable once the water has evaporated and the markers are set. The colors may fade slightly with prolonged direct sunlight exposure, so avoid displaying them in strong direct sun if you want the colors to stay vibrant for a long time.
Do I need to use a specific type of coffee filter?
Basket-style flat-bottomed coffee filters work best since they open into a large, flat circle that’s easy to color and fold. Cone-shaped filters work too but produce a slightly different flower shape. Bleached white filters show the colors most vividly, though natural brown unbleached filters can also be used and produce a more muted, vintage-looking result.
What happens if I leave the filter tip in the water too long?
The water continues traveling through the filter until it reaches the outer edges and can go no further. If you leave it very long, all the colors will eventually meet and blend completely, potentially resulting in more mixed, muddy color zones than if you removed it earlier. Removing it when the water has traveled about two-thirds of the way up the filter tends to produce the most balanced, dramatic result.
Conclusion
Rainbow walking coffee filter flowers deliver the combination most activities can only promise but rarely achieve, something that’s genuinely fun to make, genuinely interesting to understand, and genuinely beautiful to display once it’s finished. The science is real and memorable, the colors are stunning, and the whole thing comes together in under half an hour with materials that cost almost nothing. Make one, watch the colors walk, answer the questions about why it’s happening, and then make a dozen more for a bouquet that looks like it took considerably more skill and effort than a handful of markers and a cup of water.
Enjoyed this project? Get even more DIY ideas that save (and make) you money.
Join our free newsletter for profitable DIY projects, clever cleaning hacks, home ideas, and creative crafts delivered straight to your inbox.
✓ Free forever • No spam • Unsubscribe anytime




