
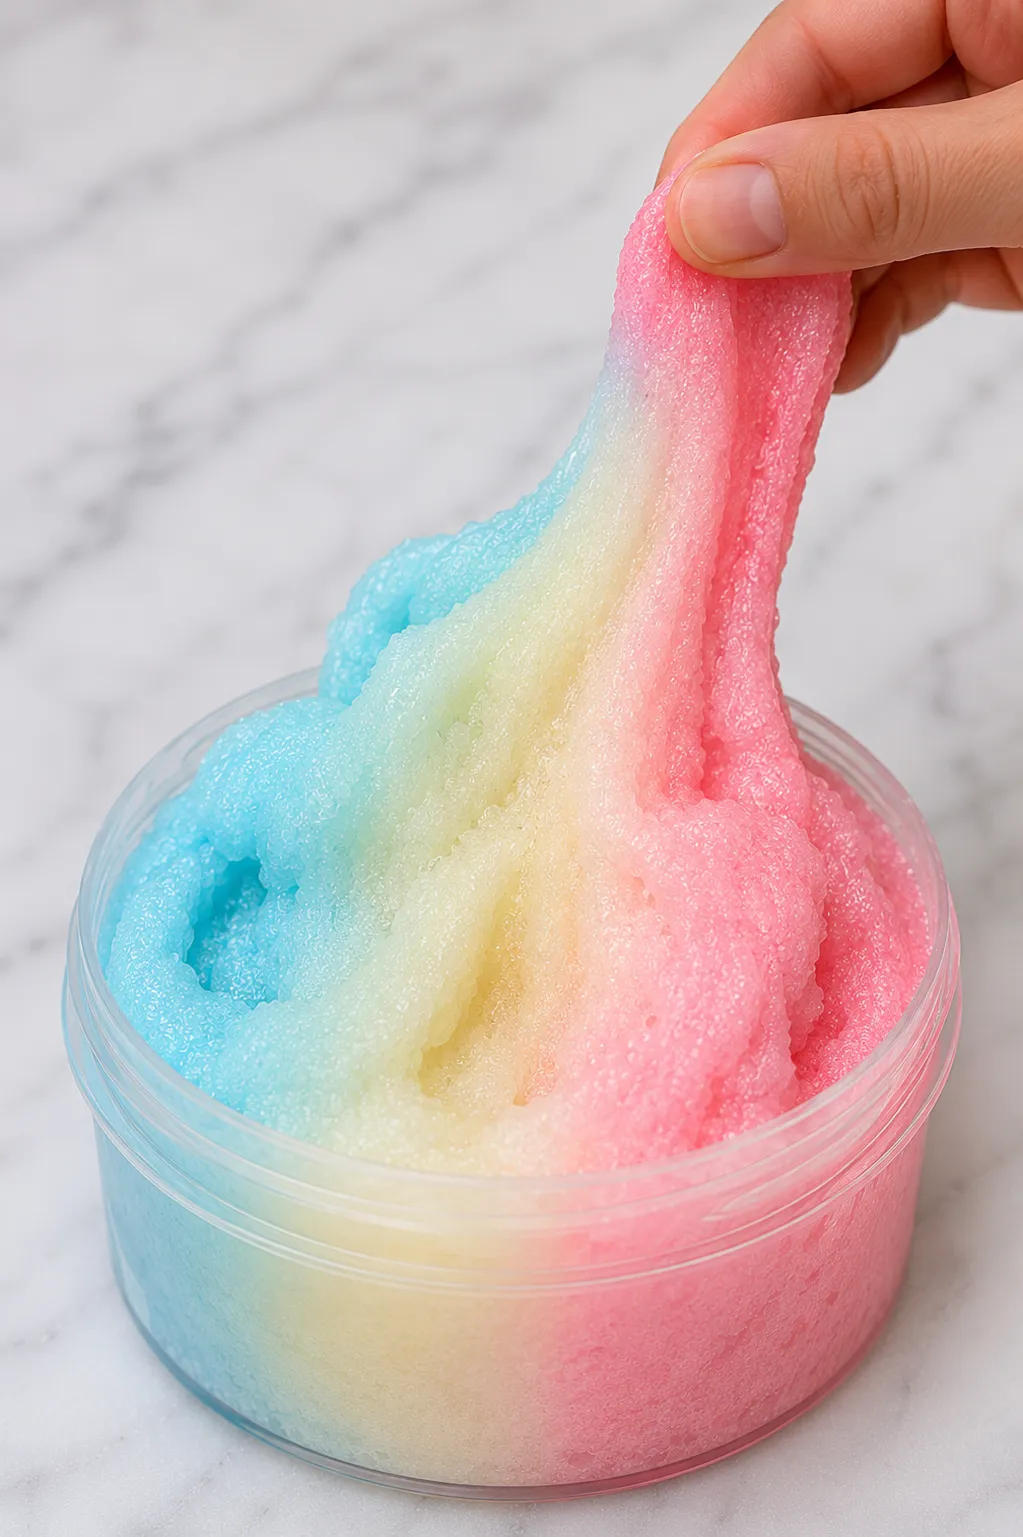
Icee slime is one of those recipes where the visual does most of the work. The translucent, jewel-toned color, the way it catches light like a frozen drink, and the slightly bubbly, textured surface all combine to create something that genuinely looks like someone scooped a cup of slushie and turned it into slime. Kids who are already obsessed with Icees and frozen drinks respond to this one immediately before they’ve even touched it, which is a good sign for any sensory activity.
The texture is what makes it interesting beyond just the look. True Icee slime has a slightly slushy, almost crunchy quality from the addition of small clear or colored fishbowl beads or instant snow, which gives it that frozen drink texture rather than just looking like a translucent colored slime. The combination of the clear glue base tinted in a drink-inspired color with the textured add-ins that mimic ice crystals is what puts it firmly in its own category rather than just being colored clear slime with a fun name.
Here’s exactly how to make it, which colors and add-ins produce the most convincing result, and how to present it in a way that fully commits to the frozen drink aesthetic.
What You’ll Need
For the slime base:
- 1 cup of clear PVA school glue
- 1 teaspoon of baking soda
- 1 to 2 tablespoons of contact lens solution containing boric acid
- Gel food coloring or liquid watercolors in your chosen Icee color
- Fine iridescent or clear glitter (optional, for extra sparkle)
- A large mixing bowl and spoon
- Clear plastic cups for display
For the Icee texture add-ins (choose one or combine):
- Clear or colored fishbowl beads for an icy, crunchy texture
- Instant snow powder for a slushy, frosty texture
- White foam micro beads for a lighter, more airy slush texture
- Chunky clear glitter or iridescent sequins for visual ice crystal effect
Why Clear Glue Is Non-Negotiable for This Recipe
The entire visual appeal of Icee slime depends on translucency. A frozen drink is translucent, jewel-toned, and lets light pass through it in a way that makes the color look vibrant and deep rather than flat and opaque. Clear glue tinted with gel food coloring replicates this exactly. White glue produces an opaque result that looks like colored putty rather than anything resembling a frozen drink.
Clear glue slime also has a natural tendency to look slightly bubbly and textured immediately after making, before the air bubbles have risen out during the resting period. That brief post-making bubbly appearance looks convincingly like a freshly poured slushy, which makes the timing of presentation particularly fun if you serve it up in a cup immediately after making rather than after the 24-hour clearing rest period.
Choosing Icee Colors
The color selection is where the frozen drink illusion really comes together, and thinking about actual Icee flavors produces more convincing results than just picking any color.
Cherry red is the most iconic Icee color and the most immediately recognizable. A vivid, slightly warm red produced by three to four drops of red gel food coloring with a single drop of orange to warm it slightly rather than a pure blue-toned red.
Blue raspberry uses a vivid electric blue, one of the most striking translucent slime colors available and one that photographs particularly well in a clear cup. Pure blue gel coloring without any purple added keeps it in the blue raspberry register rather than tipping into grape.
Grape purple uses a deep purple produced by combining red and blue gel coloring in roughly equal parts. A slightly more sophisticated color than cherry or blue raspberry and one that looks particularly striking in a wide clear cup.
Watermelon pink uses a soft, warm pink that references the lighter end of the Icee color spectrum. More delicate than cherry red and particularly popular as a summer-themed version.
Orange for an orange cream or tropical Icee effect, using orange gel coloring alone or with a tiny drop of yellow to brighten it slightly.
Green apple uses a bright, slightly yellow-toned green for a green apple flavor reference. Adding a very small amount of yellow to green gel coloring produces the right slightly sour-looking green rather than a more botanical forest green.
Making multiple colors and serving them together in separate clear cups produces the most complete Icee aesthetic, with each cup representing a different flavor the way a real Icee machine offers multiple choices.
How to Make Icee Slime
Making the Base
- Pour the clear glue into a large mixing bowl.
- Add gel food coloring and stir until fully and evenly distributed. Clear glue requires more coloring than most people expect since the transparency of the base dilutes color significantly. Use five to six drops as a starting point for a vivid result and add more if needed.
- Add fine iridescent or clear glitter if using at this stage, since incorporating it into the liquid glue distributes it most evenly through the finished slime.
- Add the baking soda and stir thoroughly until no powder remains visible.
- Add contact lens solution one teaspoon at a time, stirring continuously after each addition.
- Continue adding solution gradually until the slime pulls away from the bowl sides and comes together as a cohesive mass.
- Remove from the bowl and knead for two to three minutes until smooth and non-sticky.
- If stickiness remains, add contact lens solution one drop at a time while kneading until resolved.
- The base slime at this stage will look bubbly and slightly cloudy, which is normal for freshly made clear slime. The bubbles settle and the slime clears over 24 to 48 hours in a sealed container, but the bubbly stage genuinely looks like a fresh Icee if you want to use that moment for presentation.
Adding the Icee Texture
With Fishbowl Beads (Icy, Crunchy Texture)
- Flatten the finished slime base on a clean surface.
- Add a generous handful of clear or matching-colored fishbowl beads.
- Fold the slime over the beads and knead gently to work them in.
- Continue adding beads in handfuls, kneading between each addition, until the slime has a satisfyingly icy, crunchy texture when pressed.
- The beads should be dense enough that every press and stretch produces the clicking, icy sound that makes this version so distinctive.
With Instant Snow (Slushy, Frosty Texture)
- Prepare instant snow separately by adding water to the powder according to the package instructions until it reaches a dry, powdery snow-like consistency.
- Flatten the finished slime and spoon prepared instant snow onto the surface.
- Fold through gently, working the snow into the slime in small additions.
- The instant snow gives the slime a slightly textured, frosty surface that looks more like partially melted slush than hard ice, which is a different but equally convincing frozen drink aesthetic.
With Both (Ultimate Icee Texture)
- Add fishbowl beads first following the process above.
- Then add a smaller amount of instant snow than you would if using it alone, folding through gently.
- The combination of the hard clicking beads and the soft frosty snow texture produces the most complete frozen drink sensory experience of any single version.
Presenting Icee Slime in Cups
The presentation is a significant part of what makes Icee slime so appealing, and spending a few extra minutes on it produces a dramatically more impressive result.
Use clear plastic cups, the kind used for cold drinks, since these are the right shape and transparency to complete the Icee aesthetic. The slime in a standard storage container looks like a good slime. The same slime in a clear plastic cup with a domed lid and a straw looks exactly like a frozen drink.
Place the slime in the cup with a spoon or spatula, packing it gently and then smoothing the top slightly without flattening it completely, since a slightly mounded, irregular top surface looks more like an actual slushy than a perfectly smooth one.
Add a straw to the cup for the full visual effect. The straw doesn’t serve any functional purpose but completes the Icee illusion immediately and is the detail that makes people look twice.
Domed plastic lids, available at most dollar stores or restaurant supply stores alongside the clear plastic cups, finish the presentation completely. Placing the dome lid on top of the cup makes the slime look exactly like a sealed fountain drink from the right angle.
For a party or gift version, write the “flavor” on the side of the cup with a permanent marker in the style of a convenience store label.
Making a Full Icee Slime Flavor Menu
Making three to five different flavored Icee slimes and presenting them together as a complete menu is the version that consistently produces the most impressive reaction from kids.
Make each color as a separate batch using the same base recipe, varying only the food coloring for each flavor. Present them in identical clear cups lined up together with the flavor name written on each cup.
For a birthday party version, set up a DIY Icee slime station where kids choose their own color and assemble their own cup, mixing and matching colors for their ideal flavor combination.
For a gift version, package two or three small cups together in a clear bag tied with a ribbon, with a small “menu card” listing the flavors included.
Icee Slime Variations
Two-Flavor Swirl Icee Slime
Make two batches in contrasting Icee colors, cherry red and blue raspberry being the most recognizable combination, and swirl them together in the cup using a skewer drawn through the layers two to three times. The swirled two-tone result looks like a mixed flavor Icee and is significantly more visually striking than a single color.
Limit the swirl to two or three passes as with any swirled slime, since more manipulation blends the colors into a single muddy tone rather than maintaining the distinct color swirl.
Frozen Lemonade Slime
Use a very pale yellow, almost white-yellow, tinted clear slime with white foam beads rather than fishbowl beads for a frozen lemonade aesthetic that’s lighter and more delicate than the standard vivid Icee colors. Add a small amount of lemon fragrance oil to the glue before activating for a scented version that genuinely smells like lemonade.
Tropical Icee Slime
Layer orange, yellow, and pink slime in the same cup in horizontal layers without swirling for a sunset-gradient effect that references tropical frozen drink aesthetics. The layered no-swirl version maintains distinct color zones that look like a carefully poured layered drink rather than a blended one.
Sparkling Icee Slime
Add chunky iridescent sequins or large holographic glitter to the fishbowl bead version for a sparkling Icee slime that catches light dramatically from every angle. The combination of clear colored slime, translucent beads, and large holographic sequins produces genuine depth and dimension that’s particularly effective in a clear cup where the light passes through the whole assembly.
Glow in the Dark Icee Slime
Mix glow in the dark pigment powder into the clear glue before activating, choosing a pigment color that complements the food coloring chosen for the Icee flavor. Under normal light the slime looks like standard Icee slime. Under a UV blacklight or in darkness after charging, it glows from within like a bioluminescent version of the frozen drink.
Quick Fixes for Common Problems
| Problem | Potential Solution | Alternative Approach |
|---|---|---|
| Color looks pale and washed out | Clear glue requires significantly more food coloring than white glue—add more gel coloring gradually until vivid | Switch to liquid watercolors which produce more saturated color in clear slime than most food colorings |
| Slime looks cloudy rather than translucent | Clear glue slime needs 24 to 48 hours sealed and undisturbed to fully clear—be patient | Ensure the container is fully airtight during the clearing period since any air exposure resets the process |
| Fishbowl beads sinking to the bottom of the slime | Make the base slightly firmer by adding one extra drop of activator before adding beads | Add beads to a cooler, rested slime rather than a fresh warm batch, since cooler slime holds beads in suspension better |
| Instant snow dissolving into the slime instead of staying textured | The instant snow was prepared with too much water—make it drier next time | Add instant snow to a slightly firmer base slime so it doesn’t get absorbed as readily |
| Two-color swirl blended too quickly | Limit to two or three skewer passes maximum and stop before the colors fully mix | Rest each batch for 20 minutes before combining, since cooler rested slime resists blending longer than fresh warm slime |
| Slime sticking to the inside of the cup during display | This is normal for slime in contact with surfaces over time—run warm water over the outside of the cup to release | Line the inside of the cup with a thin layer of plastic wrap before adding slime for cleaner removal |
| Slime color changing over time in the cup | Some food colorings shift slightly in clear slime over days—gel food colorings are more stable than liquid | Store display cups away from direct sunlight which accelerates color fading in translucent slimes |
How to Store Icee Slime
Clear glue Icee slime has the same storage requirements as any clear glue base slime, with the added consideration of the add-in texture elements.
Store in a fully airtight container at room temperature. If displaying in the clear cup, place a tightly fitting lid or plastic wrap secured with a rubber band over the top of the cup between play and display sessions.
Clear glue slime stored properly lasts three to five weeks. The fishbowl bead version lasts as well as the base slime since the beads don’t introduce moisture. The instant snow version has a slightly shorter best texture period of one to two weeks before the snow texture fades as it absorbs moisture from the slime.
The 24 to 48 hour clearing period that produces the most translucent, visually impressive result happens in sealed storage, so refrigeration isn’t necessary or helpful and room temperature storage during this clearing period is optimal.
FAQ
Why does Icee slime look cloudy immediately after making but clear up later?
The cloudiness immediately after making comes from air bubbles incorporated during mixing and from the baking soda particles suspended in the glue. Both settle and dissipate over 24 to 48 hours in a sealed airtight container, producing the clear, translucent result that makes Icee slime so visually striking. This clearing process is interrupted every time the container is opened and the slime is kneaded, since both actions reintroduce air bubbles.
Can I make Icee slime without fishbowl beads if I don’t have them?
Yes. The base clear colored slime alone genuinely looks like a frozen drink even without texture add-ins, and instant snow is a widely available alternative that produces a different but equally convincing frozen drink texture. The slime-only version without any add-ins is a perfectly valid Icee slime and actually shows off the translucent color most clearly since nothing interrupts the pure colored clarity of the base.
How do I keep the straw upright in the cup during display?
Press the straw into the slime at a slight angle against the inside wall of the cup and pack the slime firmly around it so the slime itself holds the straw in position. Alternatively, use a domed lid with a straw hole since the lid itself holds the straw perfectly without any slime engineering required.
What’s the best food coloring to use for the most vivid Icee colors?
Gel food coloring from brands like Americolor or Wilton produces the most vivid, saturated results in clear slime. Standard liquid food coloring from the grocery store baking aisle works but requires significantly more drops to achieve the same color intensity and sometimes produces a slightly different shade than the vivid Icee colors being aimed for. Liquid watercolors sold for art use also work very well in clear slime and are a good option if food coloring isn’t available.
Is Icee slime safe for young children?
The recipe uses the same ingredients as standard clear glue slime, so the same safety considerations apply. The fishbowl beads are a choking hazard for children under three. The slime is not meant to be eaten despite resembling a frozen drink, which is worth being explicit about with younger children who might not make that distinction immediately. Supervision is recommended for all ages with this recipe specifically because of the convincing food-like appearance.
Closing Thoughts
Icee slime earns its place as one of the most visually distinctive slime types because it’s one of the few where the presentation is as much a part of the experience as the texture. The translucent jewel-toned color in a clear cup with a straw produces an immediate, delighted reaction before anyone has even touched it. Make the base vivid with plenty of gel food coloring, add the texture that matches the frozen drink aesthetic you’re going for, and present it in a cup rather than a standard container. The difference between Icee slime in a storage jar and Icee slime in a clear plastic cup with a domed lid is genuinely significant enough that the extra ten seconds of presentation is always worth it.
Enjoyed this project? Get even more DIY ideas that save (and make) you money.
Join our free newsletter for profitable DIY projects, clever cleaning hacks, home ideas, and creative crafts delivered straight to your inbox.
✓ Free forever • No spam • Unsubscribe anytime




