
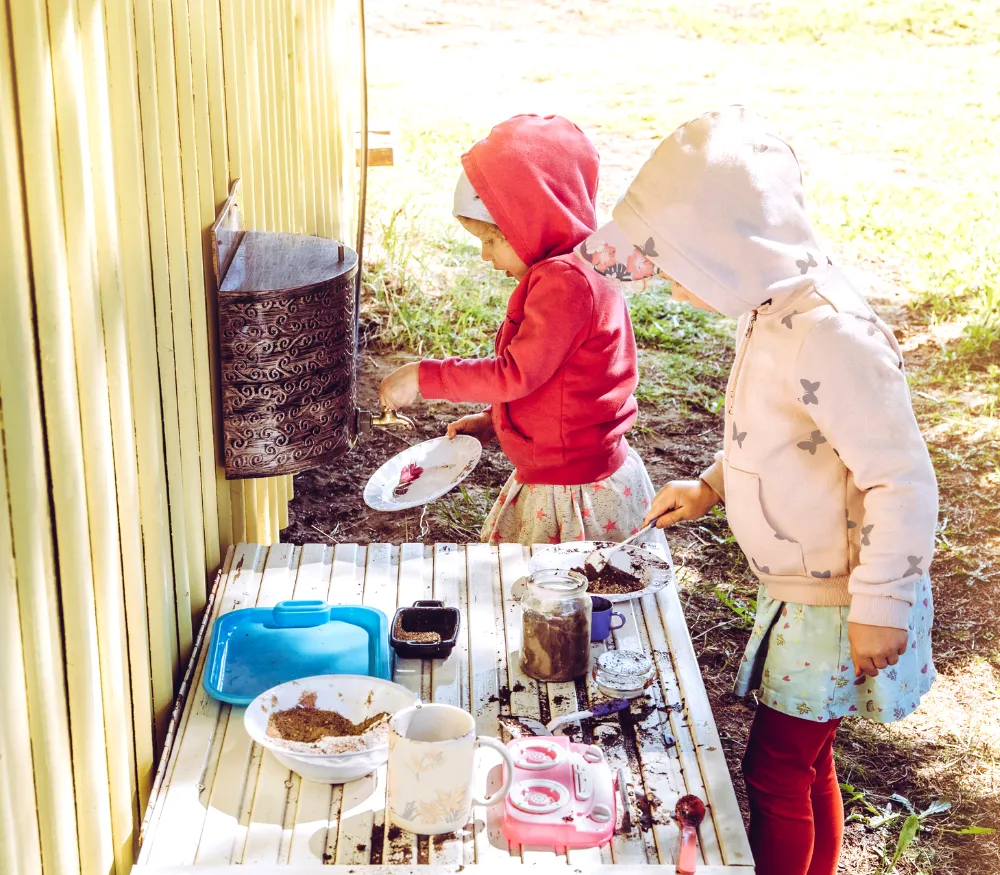
A mud kitchen is one of those outdoor play setups that looks like chaos to adults and feels like paradise to children. Give a child a few pots, some mud, water, and a surface to work on, and they will stay outside playing independently for hours in a way that almost nothing else achieves. No screen, no expensive toy, no organized activity comes close to what a mud kitchen does for sustained, creative, self-directed play.
The best part is that a mud kitchen doesn’t need to be complicated or expensive. The most basic version is a wooden plank balanced on two stumps with a bowl of water and some old pots. The most elaborate version has running water, a sink, painted surfaces, and a chalkboard menu board. Both work equally well for the children playing at them—what matters is the setup, not the sophistication.
This guide covers six different mud kitchen builds from the simplest possible starting point to a full DIY construction project, plus everything you need to know about accessories, setup, maintenance, and why mud kitchens are worth every bit of the laundry they generate.
Why Mud Kitchens Are Worth Building
Before getting into the builds, it’s worth understanding what a mud kitchen actually does for children—because it’s genuinely significant, and knowing this helps you justify the build time and the muddy clothes.
Imaginative and creative play: Mud kitchens are open-ended by design. There are no instructions, no right answers, no way to lose. Children direct their own play entirely—inventing recipes, running restaurants, making potions, baking cakes. This kind of unstructured creative play develops problem-solving, narrative thinking, and self-direction in ways that structured activities can’t.
Sensory development: Mud is one of the richest sensory materials available—it’s cool, heavy, textured, and changes consistency with water. Manipulating mud, sand, water, and natural materials engages the tactile system deeply and provides the kind of sensory input that supports regulation, particularly for children who are sensory-seeking.
Scientific thinking: Every mud kitchen session is an informal science experiment. What happens when you add more water? Why does mud stick to some things and not others? How do you get the right consistency for a “cake”? Children ask and answer these questions constantly through play.
Fine and gross motor development: Scooping, pouring, stirring, measuring, and carrying pots full of mud all develop the muscle strength and coordination that underpin later academic skills like writing.
Risk and resilience: Getting muddy, spilling, making a mess, and dealing with the physical challenge of outdoor play builds confidence and resilience. Mud kitchens are an excellent low-risk way to let children experience mess and independence.
What to Think About Before Building
Location: Choose a spot that has natural access to dirt or mud nearby. Placing a mud kitchen on a patio with no nearby soil defeats the purpose—part of the play is collecting ingredients from the garden. A partially shaded spot is ideal—full sun makes the mud dry out too quickly and makes long play sessions uncomfortable in summer.
Surface underneath: Grass, dirt, or wood chip mulch all work. Avoid placing on concrete or decking that you care about keeping clean—mud kitchens generate significant spill, and repeated mud exposure will stain and damage decking over time.
Water access: The best mud kitchens have water nearby—either a garden tap, a water butt, or a large bucket that gets refilled. Water is what transforms dirt into mud and what children reach for constantly during play. Plan how water will be provided before building.
Size: Match the size of the build to the number of children who will use it and the space available. A single child needs a surface of roughly 60–80cm wide. For two or three children playing simultaneously, 120–150cm gives enough space for parallel play without conflict.
Build 1: The Stump and Plank Kitchen (Simplest Possible Version)
This is the fastest mud kitchen you can make—assembled in under 30 minutes with no tools, no screws, and no woodworking experience. It works exactly as well as any more elaborate build for children under five, and it’s the right starting point if you want to test whether your child will actually use a mud kitchen before investing more time and materials.
What you’ll need:
- 2–4 sturdy tree stumps or large logs (roughly 40–60cm tall)
- 1–2 wooden planks or an old shelf board (at least 120cm long and 20cm wide)
- An old pot or bowl for the “sink”
- A large bucket or bowl for water
How to set it up:
- Position the stumps parallel to each other, spaced to support the plank at the right working height for your child. The working surface should be roughly at the child’s hip height—too low means uncomfortable stooping; too high means they can’t see into their pots easily. For most toddlers, 45–55cm is the right height.
- Lay the plank across the stumps to create the work surface. Test the stability before loading it with pots—it should sit level and not rock. Adjust stump position if needed.
- Place a second plank across a lower pair of stumps beneath the main surface to create a lower shelf for storing pots and tools—this adds significant functionality without any additional complexity.
- Set a large old pot or bowl on the surface as the “sink” and fill with water at the start of each play session.
- Add pots, spoons, and a scoop of dirt to get play started, then leave the child to it.
Upgrade options over time: Add a piece of pegboard at the back for hanging utensils. Drill a drain hole in the sink bowl. Paint the plank surface with outdoor paint for a cleaner look. The basic structure stays the same—the upgrades just add detail.
Build 2: The Pallet Mud Kitchen (Most Popular DIY Build)
Wooden pallets are the most popular material for DIY mud kitchens because they’re often free, already the right size, and can be configured in multiple ways without cutting or complex joinery. A basic pallet mud kitchen can be built in an afternoon and lasts several years with minimal maintenance.
What you’ll need:
- 2–3 wooden pallets (standard pallets are roughly 120cm x 100cm)
- 4 wooden fence posts or 4×4 timber legs (optional—for raising the surface to the right height)
- Wood screws and a drill
- Sandpaper (to smooth rough edges)
- Outdoor wood paint or decking oil
- An old sink, basin, or roasting tin for the “hob” or “sink”
How to build it:
- Sand all pallet surfaces thoroughly before any assembly. Pallets are rough and can splinter—sanding every surface that small hands will contact is essential, not optional.
- Stand one pallet vertically as the back panel. This creates the backdrop of the kitchen and provides a surface for hooks, shelves, and decoration.
- Attach the second pallet horizontally to the front face of the standing pallet to create the work surface. The horizontal pallet rests on the vertical one—screw through the horizontal pallet into the vertical one at multiple points for stability.
- Check the working height. Standard pallets create a surface at roughly 40–45cm, which suits most toddlers. For older children, raise the horizontal pallet by attaching it to timber legs that bring the surface up to 55–65cm.
- Cut a hole in the work surface (between the pallet slats or through a solid section) sized to fit your chosen sink basin if you want a fitted sink. Drop the basin in so it sits flush with the surface.
- Attach the third pallet as a lower shelf beneath the main work surface—prop it horizontally between the legs or screw it directly to the structure to create storage space for pots and tools.
- Paint or oil the finished structure with outdoor wood paint or decking oil to protect against weathering. Two coats with a day’s drying time between gives the best protection.
- Add hooks to the back panel for hanging utensils—simple cup hooks screwed into the pallet wood work perfectly.
Stability note: A pallet mud kitchen that will be used by multiple children simultaneously needs to be genuinely stable—children lean on these surfaces heavily. If there’s any wobble in the finished structure, add diagonal bracing at the back or stake the legs into the ground.
Build 3: The Repurposed Furniture Kitchen (Best for Minimal Effort)
Old furniture—particularly outdoor console tables, potting benches, and side tables—can be repurposed into excellent mud kitchens with very little modification. This approach works best when you find the right piece of furniture (charity shops, skips, and online marketplaces are good sources) and is often faster than building from scratch.
Best furniture pieces to look for:
- Potting benches: Already designed for outdoor use with a lower shelf and work surface at the right height. Ideal starting point requiring almost no modification.
- Console tables: Two-shelf console tables give a work surface and lower storage in one piece. Look for solid wood rather than flat-pack—mud play is hard on furniture joints.
- Wooden workbenches: Small children’s workbenches make excellent mud kitchens as they’re already child-height with built-in storage.
- Old kitchen cabinets: A base cabinet with a worktop, salvaged from a kitchen renovation, makes a genuinely impressive mud kitchen. Add a cutout for a sink and you have something that looks remarkably like a real kitchen.
What to do with the found furniture:
- Sand all surfaces to remove splinters and rough areas, particularly if the furniture has been weathered.
- Apply outdoor paint or decking oil to protect and weatherproof. Unprotected indoor furniture in an outdoor setting deteriorates within one season.
- Cut a sink hole if your chosen piece doesn’t have one. An old roasting tin, a stainless steel salad bowl, or a dedicated sink basin all work.
- Add a back panel if the piece is open-backed—a piece of exterior plywood screwed to the back creates a surface for hooks and decoration and makes the kitchen feel more enclosed and “real.”
- Lower shelf or crate storage for pots and accessories—either built into the original furniture or added with a crate or wooden box underneath.
Build 4: The Full DIY Mud Kitchen with Running Water (Best Long-Term Build)
This is the most ambitious build on the list—a properly constructed mud kitchen with a fitted sink, running water from a tap connected to a garden hose, and storage for accessories. It takes a full weekend to build but produces something genuinely impressive that will last years and get used constantly.
What you’ll need:
- Exterior plywood (18mm) for the main structure
- 4×4 timber posts for the frame
- 2×4 timber for horizontal supports
- Outdoor wood screws and wood glue
- A jigsaw or circular saw
- A drill
- Outdoor wood paint
- A stainless steel sink basin (charity shops, salvage yards)
- A garden tap connector and flexible hose
- A short length of waste pipe for drainage
- Sandpaper and exterior wood filler
Basic construction approach:
- Build the frame first from 4×4 timber posts (legs) and 2×4 horizontal supports. The frame determines the height, width, and depth of the finished kitchen—measure against your child’s hip height before cutting. A typical toddler-to-age-eight mud kitchen works well at 55cm work surface height with legs adjustable by cutting to the right length.
- Cut the worktop panel from 18mm exterior plywood to fit across the top of the frame. Cut the sink hole with a jigsaw—trace around your sink basin and cut just inside the line so the basin lip rests on the plywood surface.
- Attach the worktop to the frame with screws from beneath.
- Build the back panel from exterior plywood, cut to the full height of the finished kitchen. This panel provides rigidity to the structure and a surface for hooks, a chalkboard, or shelves. Screw into the back of the frame from behind.
- Add a lower shelf by cutting a second plywood panel and attaching it between the legs at roughly 20–25cm from the ground—enough clearance for pots and bowls to sit underneath.
- Build a simple door for the cabinet space beneath the worktop if desired—a panel of plywood on hinges with a simple wooden toggle latch. This adds significant play value: children can store their “ingredients” inside.
- Install the sink by dropping the basin into the prepared hole. Seal around the edges with waterproof exterior sealant to prevent water seeping between the basin and the plywood.
- Connect water by running a garden hose through the back panel with a simple tap connector. A basic lever tap or garden tap fitting installed through the back panel creates a functional tap that children can operate independently. Run the hose through the back of the kitchen and connect to the outdoor tap.
- Install drainage by drilling a hole in the base of the sink area and fitting a short length of waste pipe that directs water away from the base of the kitchen into the garden.
- Fill, sand, and paint with two coats of exterior paint. Allow full drying time between coats.
- Add finishing details: cup hooks for utensils, a shelf on the back panel for spice jars, a chalkboard panel painted with chalkboard paint for menus and recipes.
Water note: Running water in a mud kitchen transforms the play significantly—children return to the tap constantly to adjust consistency, wash hands between “courses,” and fill pots. If connecting to a garden hose is complicated, a large gravity-fed water butt with a simple tap is an excellent alternative that requires no plumbing.
Build 5: The Crate and Cable Reel Kitchen (Best Upcycled Build)
Cable reels—the large wooden spools used for electrical cable—and wooden crates are both excellent free or cheap materials for mud kitchens that require minimal construction skill.
Cable reel version:
Large cable reels (often available free from electrical contractors or construction sites) make perfect round mud kitchen surfaces with built-in height. Stand the reel on its end, and you have a circular work surface at a useful height with the hollow center for storage. Add a bowl as a sink, a few hooks on the side, and a shelf bracket supporting a plank for extra surface area, and you have a functional mud kitchen in under an hour.
Crate version:
Stack two or three wooden crates vertically and secure them together with screws or cable ties. The top crate becomes the work surface; the lower crates provide storage and give working height. A plank across the top two crates creates a larger surface. Paint or varnish before use outdoors.
Combining both:
A cable reel as the main surface with crates on either side for extra work surface and storage creates a generous kitchen that multiple children can use simultaneously—all without cutting a single piece of wood.
Build 6: The Mud Kitchen With a Pizza Oven Add-On (Best for Older Children)
For children aged four and up who have outgrown simple mud play and want more complex imaginative scenarios, adding a pretend pizza oven or fire pit to the mud kitchen setup dramatically extends the play. This isn’t a working oven—it’s a visual prop that anchors more sophisticated imaginative play around baking, cooking over fire, and running a restaurant.
Simple pizza oven add-on:
- Build or repurpose a box from exterior plywood—roughly 40cm wide, 30cm deep, and 30cm tall with a rounded arch cut into the front using a jigsaw to create the “oven opening.”
- Paint the exterior with heat-effect paint (black and grey tones) to look like stone or clay.
- Mount on the side of the main mud kitchen at a slightly lower height than the main work surface, or set on the ground beside it.
- Add a short chimney from a section of drainpipe mounted to the top—purely decorative but very convincing.
- Place a few round stones or painted wooden discs inside as the “pizza base” surface.
Older children use this structure as the anchor for elaborate restaurant and bakery play—taking orders on the chalkboard menu board, preparing food at the main kitchen surface, and “cooking” in the oven.
Essential Mud Kitchen Accessories
The kitchen itself is the foundation—the accessories determine the depth and variety of play.
Basic kit (start here):
- Old saucepans and frying pans (charity shops are excellent for these)
- Wooden spoons and spatulas
- Measuring cups and spoons
- A colander or strainer
- Small jugs and pitchers
- Plastic bowls in multiple sizes
Extended kit (add over time):
- A pestle and mortar for grinding seeds, petals, and herbs
- Muffin tins and loaf tins for “baking”
- A salad spinner for washing “ingredients”
- Small watering cans for water pouring
- Old spice jars filled with sand, pebbles, or seeds as “ingredients”
- A chalkboard or whiteboard for menus
- A balance scale for measuring
Natural materials to provide:
- A tray of sand
- A basket of pebbles
- Pinecones, seed pods, and bark
- A pot of herbs growing nearby (mint, rosemary, and lavender add sensory richness to mud kitchen play)
- Flower petals
- Sticks in different sizes
- Leaves in different shapes
Tools for older children:
- A simple funnel system with pipes and tubes for water play
- A pulley system for lifting buckets
- A sieve and grading system for sorting soil
Keeping the Mud Kitchen Usable Year-Round
In wet weather: A roof over the mud kitchen—even a simple piece of corrugated roofing on posts—keeps the surface dry enough to use in light rain and prevents the structure from deteriorating as quickly. Children often prefer playing at the mud kitchen in light rain anyway.
In winter: Cover the kitchen with a tarpaulin when not in use to protect the wood. Bring metal pots inside to prevent rust. Check for wood rot at joints and treat annually with decking oil before the wet season.
In summer: Keep a large bucket of water nearby that children can refill themselves. Direct sun dries mud very quickly—a partially shaded location solves this, or provide a lid or cover for the mud supply to keep it workable.
Refreshing the mud supply: Once or twice a season, top up the mud area with a bag of topsoil mixed with a little sand. Pure clay soil becomes brick-hard when dry and won’t mix well with water—a soil-sand mixture stays workable in more conditions.
Safety Considerations
- Check all wood for splinters before each season. Sand any rough areas immediately.
- Check screws and joints for loosening annually—mud play is physical and structures take more stress than they appear to.
- Avoid treated timber that uses chemical preservatives like CCA (chromated copper arsenate)—older pallets and reclaimed timber sometimes contain these. Use heat-treated (HT marked) pallets and construction-grade untreated timber for any mud kitchen children will have direct contact with.
- Position away from compost heaps or areas where garden chemicals are used.
- Wash hands after mud play—not because mud is dangerous, but because garden soil can contain trace bacteria. Basic handwashing after play is sufficient.
FAQ
What age is a mud kitchen suitable for? With supervision, from around 18 months. At this age, children engage with the sensory aspects—touching, pouring, and exploring textures. By three, children are doing full imaginative play with recipes, roles, and scenarios. Mud kitchens remain engaging through primary school age for most children—often longer.
How do I keep the mud kitchen from becoming a soggy mess? Wood chip mulch or gravel under and around the kitchen area absorbs water and mud rather than allowing it to pool. A defined mud area—a sunken section filled with soil, bordered by stones or sleepers—keeps mud play contained to a designated zone.
Do I need to seal the wood? Yes, for longevity. Untreated exterior plywood deteriorates within one to two seasons in regular outdoor use. Two coats of exterior paint, decking oil, or wood preservative extends the life of any mud kitchen build significantly.
Can I use a mud kitchen indoors or in an apartment? A version of the concept works indoors with sand and water trays instead of actual mud—same setup, same accessories, just contained to a tray. For actual mud play, outdoor space is needed.
The Bottom Line
A mud kitchen doesn’t need to be elaborate to be excellent—the simplest stump-and-plank setup works as well for young children as the most sophisticated full build. Start with whatever you can put together quickly using materials you already have, watch how your child engages with it, and then invest in improvements based on what they actually play with. The accessories matter as much as the structure—a set of good pots and a water source transform even the simplest surface into a genuinely engaging play kitchen. Build it, muddy clothes and all, and prepare for the best outdoor play decision you’ve made.
Enjoyed this project? Get even more DIY ideas that save (and make) you money.
Join our free newsletter for profitable DIY projects, clever cleaning hacks, home ideas, and creative crafts delivered straight to your inbox.
✓ Free forever • No spam • Unsubscribe anytime




