
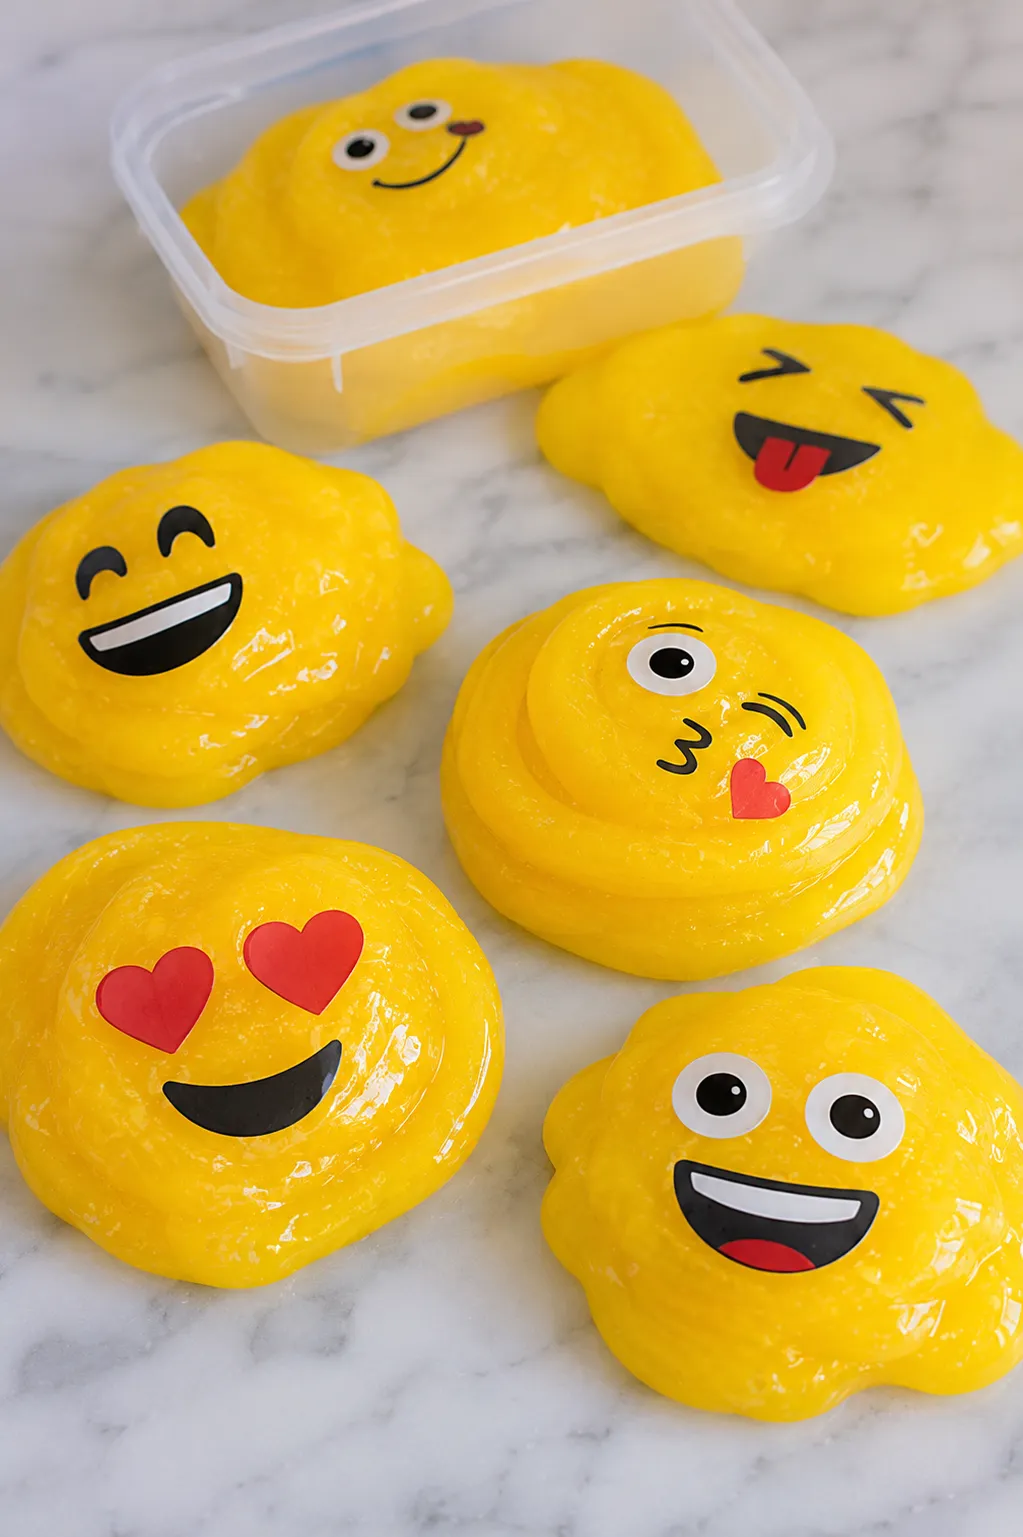
Emoji slime takes the familiar yellow circle and iconic expressions everyone recognizes and turns them into the focal point of a slime-making activity that’s as much about the art as it is about the sensory play. The finished slimes look like giant emoji faces sitting in jars, and the combination of the universally recognizable imagery with bright color and satisfying slime texture produces something kids genuinely want to make, display, and give as gifts.
The recipe is straightforward standard slime. What makes this version distinctive is the decorating stage, where emoji faces are created on the surface of the finished slime using either polymer clay details pressed into the slime or food coloring painted on with a fine brush. Both methods work and produce quite different finished results, and knowing which works best for which situation makes the process significantly easier.
What You’ll Need
For the slime base:
- 1 cup of clear PVA school glue
- 1 teaspoon of baking soda
- 1 to 2 tablespoons of contact lens solution containing boric acid
- Yellow gel food coloring or liquid watercolors
- A large mixing bowl and spoon
- Wide-mouthed jars or round containers for display, one per emoji
For the emoji faces (choose one method or combine):
- Black and white polymer clay or air dry clay for sculpted facial features
- Black food coloring gel and a fine paintbrush for painted details
- Black and colored edible markers or food-safe markers for drawn details
- Pre-made googly eyes or white and black cardstock circles
- Red, pink, and white polymer clay for blush, tongue, and teeth details
- A toothpick or skewer for fine detail work
Why Clear Glue Works Best for Emoji Slime
Clear glue tinted with yellow produces a vivid, clean yellow that looks exactly like an emoji. White glue tinted yellow produces a more opaque, slightly washed-out yellow that doesn’t capture the bright, saturated tone that makes emoji immediately recognizable. The transparency of clear glue allows the yellow food coloring to show at its most vivid and creates the characteristic bright emoji yellow that white glue simply doesn’t achieve.
How to Make Emoji Slime
Making the Yellow Base
- Pour the clear glue into a large mixing bowl.
- Add yellow gel food coloring and stir until fully distributed. Use more coloring than feels necessary since the yellow needs to be vivid and saturated to read as emoji yellow. Start with five to six drops and assess before adding more.
- Add the baking soda and stir until no powder remains.
- Add contact lens solution one teaspoon at a time, stirring continuously after each addition.
- Continue until the slime pulls away from the bowl sides and comes together as a cohesive mass.
- Knead for two to three minutes until smooth, clear, and non-sticky.
- If stickiness remains, add contact lens solution one drop at a time while kneading until resolved.
- Once finished, the slime should be a vivid, translucent yellow with a smooth, stretchy texture.
Placing the Slime in Display Containers
Emoji slime is as much a display item as a play material, and placing it in round, wide-mouthed jars shows off the emoji face on the top surface most effectively.
- Press the finished yellow slime into a wide-mouthed jar or round container, filling it roughly two thirds full.
- Smooth the top surface as flat as possible using the back of a spoon or clean fingers.
- The flat surface is the canvas for the emoji face, so taking time to get it smooth makes the detailing step significantly easier.
Creating the Emoji Faces
This is where the activity becomes genuinely creative, and there are two distinct methods worth knowing depending on the age of the kids involved and the materials available.
Method 1: Polymer Clay Details (Best for Defined, Durable Features)
Polymer clay produces the most defined, professional-looking emoji features since the clay can be sculpted precisely, holds its shape on the slime surface, and creates a satisfying dimensional quality that looks great in photos and display.
For the eyes:
- Roll a small piece of white polymer clay into a smooth ball, then flatten it slightly into an oval or circle shape.
- Roll an even smaller piece of black clay into a ball and press it onto the center of the white piece.
- Add a tiny dot of white clay on top of the black for the classic highlight that makes cartoon eyes look alive.
- Make two identical eye pieces and press them gently onto the slime surface at the appropriate position for the emoji being made.
For the mouth:
- Roll a thin rope of black clay for a simple smile or frown line.
- Curve it into the appropriate expression and press gently onto the slime surface below the eyes.
- For an open mouth emoji, roll a small piece into a rounded rectangle or oval and press flat.
- Add small white clay rectangles inside an open mouth for teeth.
- Add a small pink or red clay tongue shape inside a laughing or silly expression.
For blush circles:
- Roll small pieces of pink or coral clay into balls and flatten into circles.
- Press gently onto the slime surface at the cheek position on either side of the mouth.
Polymer clay features can be left uncured since they sit on rather than inside the slime. They stay in position well during display and can be repositioned if the placement isn’t quite right.
Method 2: Painted Details (Best for Younger Kids and Quick Sessions)
Painting emoji features directly onto the slime surface with food coloring gel and a fine brush is faster than clay, requires no additional materials beyond what most households have, and works particularly well for younger kids who find clay detail work too fiddly.
- Dip a fine-tipped paintbrush into black gel food coloring.
- Paint the eye shapes directly onto the smooth slime surface, working with confident, deliberate strokes rather than tentative ones since hesitant strokes create blurry edges.
- Add any additional colored details, such as pink blush circles or red tongue, using the same method with different colored gel food colorings.
- Allow each color to dry briefly before adding details on top.
- A toothpick works well for adding very fine details like eyelashes or small text elements.
Painted details are less durable than clay since they can smear when the slime is played with, which makes this method better suited to display-focused emoji slime rather than play-focused versions.
Method 3: Pre-Made Elements (Easiest Method for Any Age)
This method uses existing materials to create emoji faces without any sculpting or painting.
- Cut white circles from cardstock or foam sheets for the whites of eyes.
- Cut or punch smaller black circles for pupils.
- Layer and glue these together using a tiny dot of white glue, then press gently onto the slime surface.
- Use a black edible marker or food-safe marker drawn on a small piece of white paper for mouth details, then press the paper piece onto the slime.
This method works well as a group activity for parties or classrooms since it requires no specialized materials and produces consistent results even with very young participants.
Emoji Designs to Make
😊 Happy Face
The classic starting point and the most immediately recognizable emoji. Two round eyes and a gentle curved smile. Simple enough for first-timers and satisfying enough for anyone. Add small pink clay circles at the cheeks for extra warmth.
😂 Laughing Crying Face
The most popular emoji of the modern era and one of the most fun to make in slime form. Curved, almost closed eyes with small teardrop shapes at the inner corners. Wide open mouth with teeth visible and a small tongue. This one benefits most from the dimensional polymer clay method since the open mouth with teeth has enough detail to be worth sculpting properly.
😍 Heart Eyes Face
Use red or pink clay or painted hearts in place of the standard round eyes. A simple smile beneath the heart eyes. This version is popular for Valentine’s Day themed emoji slime sets and produces immediately recognizable results even with a very simple execution.
😎 Sunglasses Face
Replace the standard eyes with dark clay or painted sunglasses shapes, either the classic oval lens style or a more rectangular modern style. A cool, slight smirk rather than a full smile. This one works particularly well in display jars since the sunglasses detail is visually distinctive from across a room.
🤩 Star Eyes Face
Replace round eyes with star shapes cut from yellow or gold clay or painted with food coloring. A wide open smile beneath the star eyes. Great for a “celebrity” or “amazing” themed slime set.
😜 Winking Face
One standard open eye and one closed eye represented by a curved line. A playful expression with tongue sticking out to one side. The asymmetry of the winking expression makes this one slightly more challenging to execute but more interesting visually than fully symmetrical faces.
😡 Angry Face
Add a small amount of red or orange gel food coloring swirled into the yellow slime base to give it a slight orange tint that reads as an angry flush. Furrowed brows made from angled black clay or painted lines above the eyes. A small, tight downward curve for the frown.
🤢 Sick Face
Tint the slime base very pale green rather than yellow using a small amount of green mixed with the yellow. Standard eyes with a slightly uncomfortable expression. A small green clay or painted swirl detail for extra sick-face authenticity.
Making a Full Emoji Slime Set
Making multiple emoji slimes together and displaying them as a set produces a significantly more impressive result than a single jar, and a set of five to eight emoji jars arranged together makes an excellent display, gift, or party activity.
For a set, make one large batch of yellow slime and divide it evenly between wide-mouthed jars before decorating each one with a different expression. This is more efficient than making individual batches and ensures all the yellow slimes in the set are the same shade.
Vary the expressions across the set to represent the range of common emoji, since a set of all happy faces is less interesting than a set that includes happy, laughing, heart eyes, sunglasses, winking, and angry.
Label the underside of each jar with the emoji character it represents, since this detail makes the set feel more curated and allows for easy reorganization if display order changes.
Emoji Slime as a Party Activity
Emoji slime works particularly well as a structured party activity since every child ends up with an individual creation that’s both a craft and a take-home party favor simultaneously.
Set up stations with pre-made yellow slime portions, round jars or containers, and a selection of clay pieces or painting materials for the faces. Allow each child to choose their emoji expression and decorate their own jar.
Keep a reference sheet of common emoji faces at each station so kids can choose from a selection rather than trying to imagine what their chosen expression looks like, since even kids very familiar with emoji sometimes struggle to recall the exact details when trying to recreate them from memory.
Pre-make the slime before the party and divide it into individual portions, since making slime from scratch as a party activity takes more time and supervision than most party timelines allow. The decorating stage is the part kids engage with most deeply, so that’s where to focus the activity time.
Quick Fixes for Common Problems
| Problem | Potential Solution | Alternative Approach |
|---|---|---|
| Yellow isn’t vivid enough and looks pale | Clear glue requires significantly more food coloring than people expect—add more gel coloring gradually | Switch from liquid food coloring to gel coloring, which produces more saturated color in clear slime |
| Clay details sinking into the slime | Make the slime slightly firmer by adding one extra drop of activator before placing in the jar | Press clay pieces onto a very thin layer of slime on top of the main batch rather than directly into a soft surface |
| Painted details smearing when slime is touched | Painted details work best on display-only emoji slime—switch to clay details for slime that will be actively played with | Seal painted details with a very light touch of clear nail polish applied carefully to the detail area only |
| Eyes look uneven or misaligned | Make both eye pieces before pressing either onto the slime, then position them simultaneously rather than one at a time | Use a circular punch to make consistently sized eye pieces from clay rather than rolling by hand |
| Slime turned greenish rather than yellow | Too much blue or green food coloring got mixed in—start fresh with clean bowls and ensure gel coloring is pure yellow | Some yellow gel food colorings have a slight green undertone—try a different brand for a warmer, more orange-yellow tone |
| Clay details don’t stay on slime surface | Press pieces slightly more firmly into the slime surface so they key in rather than just sitting on top | Apply a tiny amount of clear craft glue to the underside of clay pieces before pressing onto the slime |
| Mouth expression doesn’t look like the intended emoji | Keep a phone or printed emoji reference sheet beside the workstation during the detail stage | Simplify the expression to just the most essential features, since less detail often reads more clearly than an overcrowded face |
How to Store Emoji Slime
Emoji slime is primarily a display item, so storage considerations center around preserving both the slime quality and the emoji face details.
Store in the wide-mouthed jar with the lid sealed tightly between display and play sessions. The face details are visible through the top of the jar even when closed, making emoji slime one of the few slime types that looks as good in storage as it does on display.
Clay details remain stable on the slime surface for weeks and don’t require any special treatment beyond the normal airtight container storage that all slime needs.
Painted details are less stable and may blur slightly if the slime is played with or handled, which is worth mentioning as an expectation when making the painted version rather than clay.
Properly stored clear glue emoji slime lasts three to five weeks before significant texture changes.
FAQ
Can I make emoji slime in colors other than yellow?
Standard emoji are yellow, but making emoji slime in skin tone shades, green for alien emoji, or other colors for specific expressions works fine. The recipe is the same regardless of color. Blue for a crying face, red for an angry face with the slime color matching the expression are fun variations from the standard yellow.
What’s the best container shape for emoji slime?
Round, wide-mouthed jars produce the most authentic emoji appearance since emoji are circular. Square containers don’t capture the round emoji shape as well visually. Clear containers are essential since they allow the yellow slime color and face details to be visible even when the jar is closed.
How do I make the slime surface smooth enough to decorate?
Press the slime firmly into the jar and smooth the top with the back of a damp spoon. Allow it to rest for five to ten minutes after pressing before adding details, since freshly pressed slime sometimes has small air bubbles that settle during the brief rest period, producing a smoother surface.
Can children make this activity independently or does it need adult help?
The slime-making stage needs adult supervision for all ages, particularly around the activator. The decorating stage with pre-made clay pieces or the pre-made elements method is completely independent for children six and up. The painting method works independently for children eight and up with reasonably good fine motor control.
How many jars of emoji slime can one batch of slime make?
One cup of clear glue produces enough slime for approximately three to four standard-sized wide-mouthed jars filled two thirds full. Scale the recipe up proportionally for larger sets, since a set of eight emoji requires roughly two and a half cups of glue.
Closing Thoughts
Emoji slime works because it takes something universally recognized and beloved and gives kids genuine ownership over recreating it in a tactile, creative medium. The yellow slime base is simple enough that no experience is required. The face decorating stage has enough creative decision-making to feel genuinely personal rather than prescriptive. And the finished result is something that looks good enough to display, makes a genuinely appreciated gift, and produces one of those reactions where the recipient immediately identifies what it is and smiles before they’ve even picked it up. Make a set of five or six different expressions and the whole is significantly more impressive than any single jar.
Enjoyed this project? Get even more DIY ideas that save (and make) you money.
Join our free newsletter for profitable DIY projects, clever cleaning hacks, home ideas, and creative crafts delivered straight to your inbox.
✓ Free forever • No spam • Unsubscribe anytime




